The topic of this post is a Malwarebytes CrackMe—an exercise in malware analysis that I recently created. First, the challenge was created to serve internal purposes, but then it was released to the community on Twitter and triggered a lot of positive response. Thanks to all of you who sent in your write ups! Some of the links are included in the appendix.
I got several questions from people who were stuck and needed some more explanation/guidance. So I promised to present my own solution in a step-by-step tutorial to the CrackMe. I am going go into detail so that even someone with little experience in reverse engineering will not feel lost. But if you still find something unclear, please don’t hesitate to ask in the comments.
The CrackMe was intended to be simple, yet to demonstrate various techniques commonly used by malware—that’s why we hoped it would be a good learning experience for the beginner malware analyst. Like always, the demonstrated solution is just one of many possible approaches.
Techniques demonstrated
The techniques/skills that we wanted to exercise in the CrackMe are:
- Noticing common evasion tricks (antidebug, anti-vm, etc.) and bypassing the checks
- Detecting XOR-obfuscated payload and decoding it
- Basic understanding of the RunPE technique
- Finding a way to debug/load shellcode
Environment and tools used
For the analysis environment, I used Windows 7 32bit on Virtual Box, with an Internet connection.
During the analysis, I used the following tools:
- For static analysis: IDA (demo version is enough)
- For dynamic analysis: ImmunityDbg/OllyDbg/x64dbg
- PE-bear
- Fiddler
Stage 1
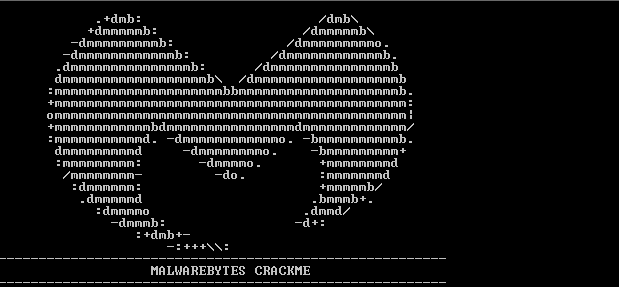
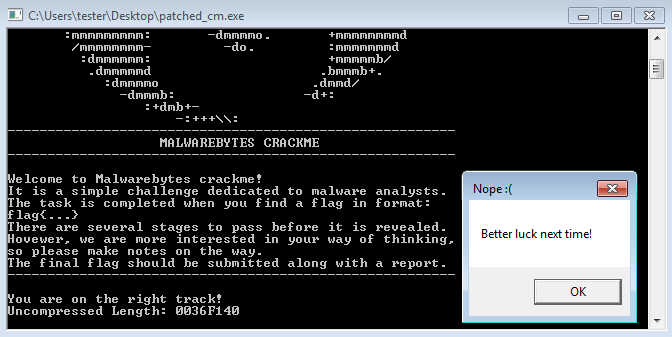
When we run the CrackMe, the first thing we see is the following banner:
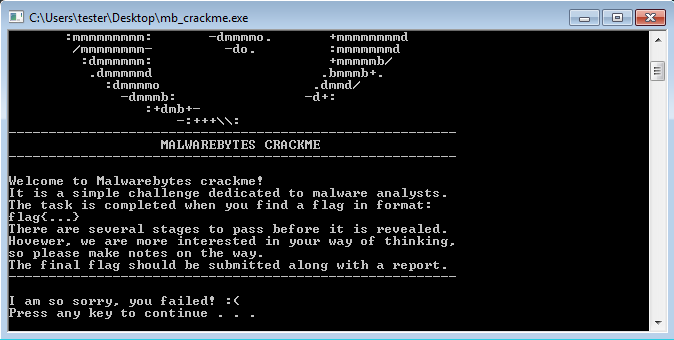
So far, we know that the CrackMe is finished when we get a flag in the following format: flag{...} There is no password prompt whatsoever—we just see the failure message on the screen. The only way to understand it more is by looking inside. For this purpose, I am going to use IDA.
Finding the decisive variable
The code is not obfuscated, and we can easily see that this message comes after the check:
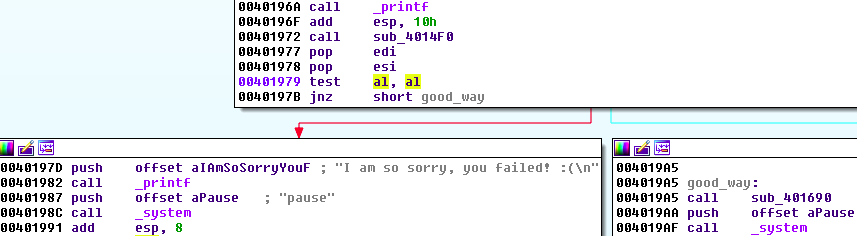
The success of the check will depend on the value of AL registry (AL=0 leads to failure). This value is set in the function above: sub_4014F0. Let’s go inside the function and see where exactly is it set:
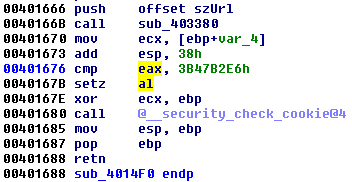
So there is some variable (IDA automatically named it szUrl, suggesting that it will be used somewhere as a URL) that is passed to a function
sub_403380szUrl filled in such a way that it will give us the valid checksum: 0x3B47B2E6Finding references
First, let’s have a look at the external references (xrefs) of the variable
szUrlto find out how is it used and where is it set. We can view them by pressing
CTRL+Xin IDA:
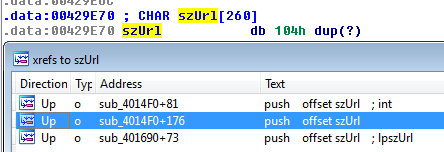
As you can see, it is referenced from three places in the code. The second (highlighted) one is the place where we came from (szUrl being passed to the checksum calculation).
How is the variable used?
The third xref will probably refer to the usage of this variable. So, let’s see it:
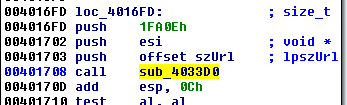
Entering in the function sub_4033D0, we can see some API calls related to reading the content from the given URL, such as:
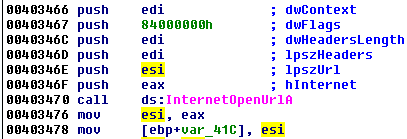
And:
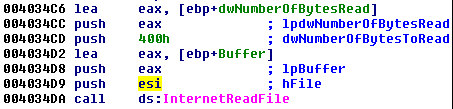
At this point, we can be sure that the content of the szUrl, if filled correctly, will be used to download some content from the Internet.
How is the variable filled?
Now let’s have a look at the first reference and find out where the value of szUrl comes from:

We can see it is one of the parameters passed to the function sub_4031C0. This function takes also an array of DWORDs. Let’s look inside the function. We can see that Windows Crypto API is being used:

The passed content is decrypted with the help of Windows API, using AES algorithm.
Following the order of the passed parameters, it is easy to guess that this function is going to decrypt the passed buffer (the array of DWORDs) and the szUrl will be used to store the output. So the only thing that we need to take care of is a valid key for the decryption. Then we will get the proper URL that has the defined checksum 0x3B47B2E6.
Finding the decryption key
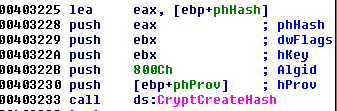
The key is derived from the hash another buffer, passed as one of the function’s parameters. We can see that Windows Crypto API is used to derive the hash. The used hashing function is SHA256 (algorithm ID: 0x800C = CALG_SHA_256):
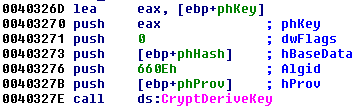
This hash is used to derive the AES128 key (algorithm ID: 0x660E = CALG_AES_128):
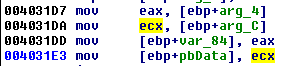
We find that the buffer used as the base of the key is passed as a 4-th parameter to the function:
Let’s name it key_buf and find out where is is passed to the function:
Again, xfers can tell us more about where is it set:
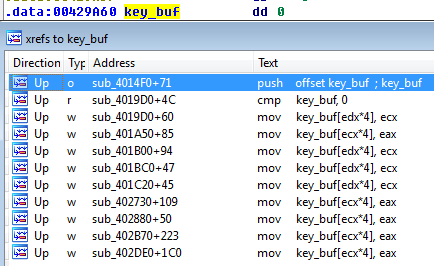
We find out that the full buffer consists of pieces that are set DWORD by DWORD in various functions. Let’s have a look at each of those functions.
At this point, things are getting easy: We have various environment checks that malware often uses for recognizing if it is run in a controlled environment or not. For example, checking if it runs under the debugger:
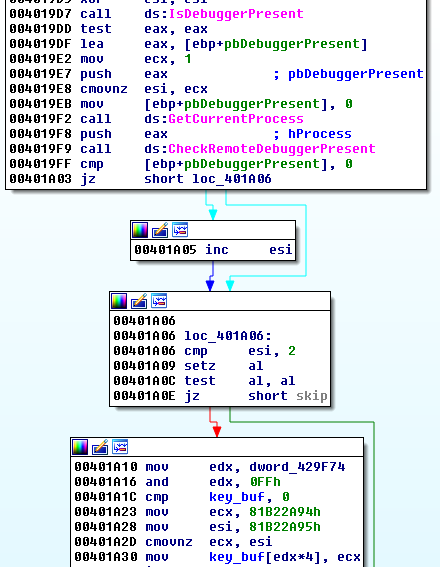
While malware detecting the debugger often terminates the execution, in this case the conditions are reversed. Having each check passed/item detected gives us one more piece of data to the buffer. We need to catch them all!
We may achieve it by following each check and patching it out (removing the conditional jump) so that the chunk will be added to the buffer unconditionally. You can use IDA for patching, but IMHO it is not convenient, so I usually do it with the help of some other tools (debuggers like OllyDbg, or PE-bear), and use IDA just to find the branches.
Example: removing conditional checks in PE-bear:
Follow the offset of the check (CTRL+R):
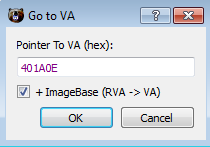
Select the bytes on the hex view and modify them:
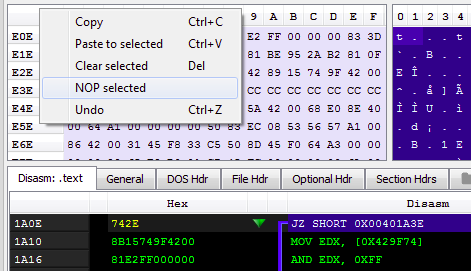
Result:

After following and removing all the checks, we can save the patched file:
If we deploy the patched version, we see some progress! The message “You are on the right track!” is printed on the screen. We can also see a hint that something is being uncompressed.
Examining the traffic
We already know that something was downloaded from the Internet (using the decrypted URL), so it may be helpful to have a closer look at the network traffic. There are many ways of checking the URL that was queried. We can do it with the help of Wireshark or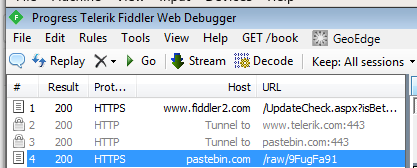
Request and response:
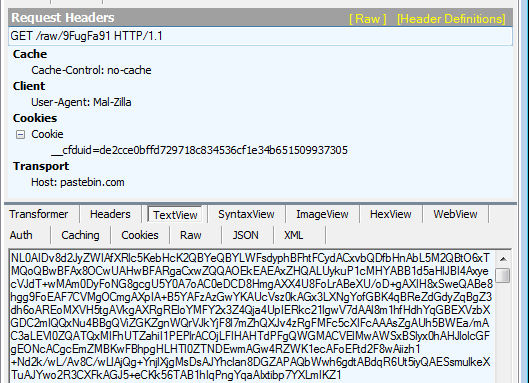
We see that the content was downloaded from the pastebin from the URL: http://pastebin.com/raw/9FugFa91
The content is in Base64, but decoding it by a Base64 decoder does not give us any sensible result. (We guess that the reason is the content is compresses and/or further encrypted). So, let’s go inside the applications again!
Understanding the payload
First, let’s do some static analysis to understand what exactly this payload is supposed to be and how is it going to be used. Let’s search first where the “Nope :(” message box is being shown. We see that before there is a check if the buffer starts from “MZ,” it is a well-known magic number starting DOS applications and also Windows Executables (PE files).

Taking a closer look at this function, we find out that the downloaded file is processed by few functions.
First, it is base64 decoded. Then, the output is uncompressed:
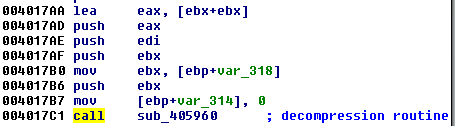
We understand that this function is responsible for decompression by looking inside and finding the relevant API calls, such as RtlDecompressBuffer:

Then, we notice a function that reads like something from the clipboard:
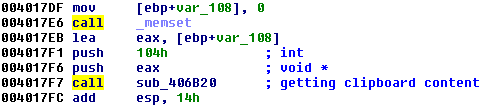
Going inside it, we can also easily find relevant API calls, such as:
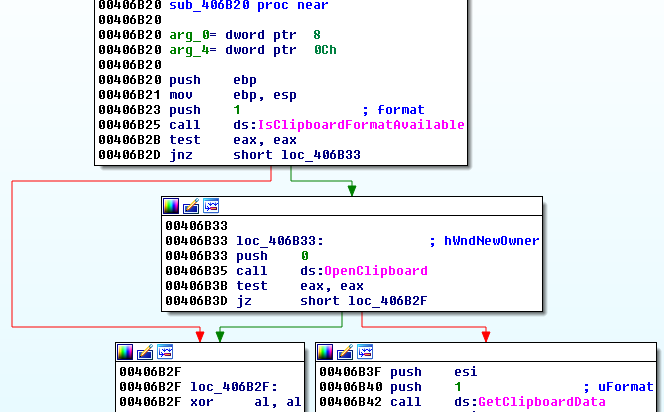
We find that the format that is being read from the clipboard is one that measures text (CF_TEXT).
Then, we find that the content that was read from the clipboard is being used by another function. It becomes an XOR key to decrypt the downloaded content:

After all this, the result starts from the “MZ” magic number. It is being injected into rundll32.
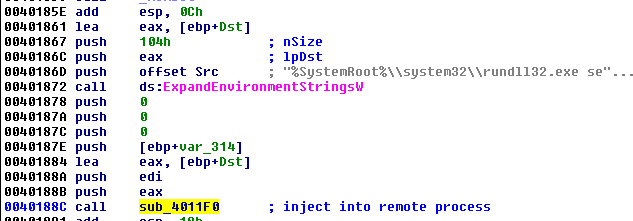
Following inside the function sub_4011F0, we see exactly how the injection was made. It is a classic RunPE technique. The new process is created as suspended. The payload is being written into its memory space, linked to its PEB and resumed:
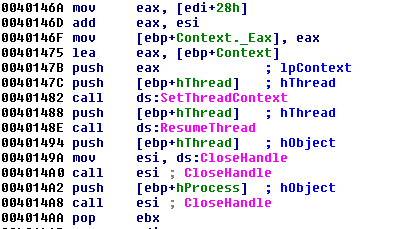
More detailed explanation of this well-known technique is out of scope of this article (you can find it here). However, unpacking it is very easy—we just need to dump the payload after it is decrypted but before it is converted into the virtual format and written to the remote process. I will show some of the possible unpacking methods next.
Decrypting the payload
During the static analysis, we found out the following information:
- The payload is downloaded from the decrypted URL
- It is Base64-decoded
- It is decompressed with RtlDecompressBuffer
- It is XOR-decrypted with the help of some key that is read from the clipboard
To pass this level, we must find the XOR key. It will not be difficult, knowing that the XOR operation is self-reversible. But first, let’s dump the payload after it is decompressed so that we can get the material for further analysis.
I will run the patched version of the CrackMe under the debugger (e.g. ImmunityDbg) and go to the API call RtlDecompressBuffer:

I am setting the breakpoint at the end of the decompression function and then running the CrackMe.

We can see on the stack the variable that was passed to the function. Let’s follow the buffer that was uncompressed:
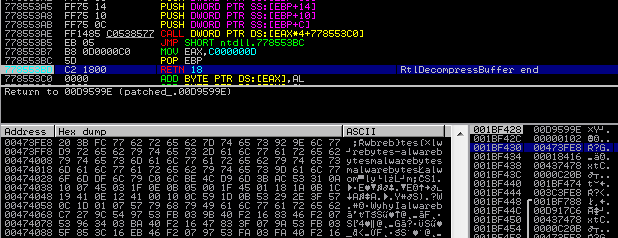
We can see some repetitive patterns and the string “malwarebytes.” It is easy to guess that it will be the XOR key passed via clipboard. At this point, we can choose various approaches of unpacking it. I will demonstrate just one of them.
Decoding the XOR-obfuscated payload
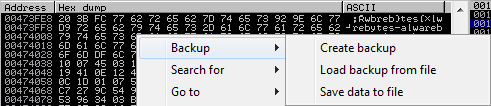
After the buffer is decompressed, we dump it to file and decode by our external tool dexor.py.
First, we dump the buffer:
Then, we have to trim it so that it will start from the proper offset. We can do so by opening the dumped memory page in XVI32 hexeditor, navigating to the beginning of out buffer, and choosing:
Edit->Dump to cursor
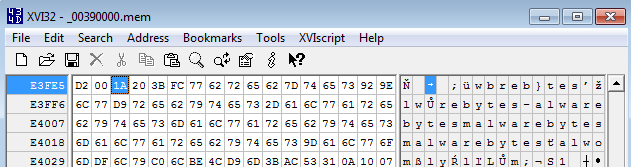
Then, we can easily decode it by the script, supplying the XOR key. In this case, we could easily guess that the key is “malwarebytes” because this string repeats multiple times in the decoded buffer (XOR key is visible in those fragments of file when it was applied on NULL bytes).
dexyor.py --file dump.bin --key "malwarebytes"
You can see the steps taken on the video below:
As we expected, based on the earlier findings, the decoded output is a new PE file.
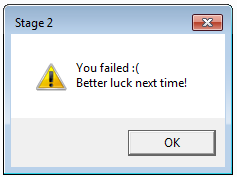
Stage 2
Stage 2 is inside the new executable. After we dumped it, we can run it as a fully independent module. We see that it pops up the following message:
Let’s open it in IDA and have a look. It is not obfuscated and the structure is pretty simple.
Understanding the checked conditions
First of all, we can see why the “Fail” message was displayed. The first thing that is checked is the module path, compared with the path to rundll32.exe. The check is not done by direct comparison of the strings, but instead, the checksums of the paths are calculated and compared:
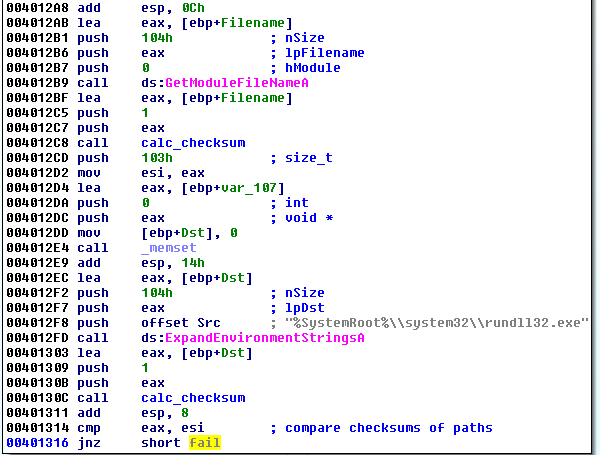
In short, if the current PE is not injected into the rundll32.exe, the check should fail and lead to the mentioned message box. At the moment, we want to run this PE file as an independent unit, not via rundll32. So we need to get rid of this check. We can do it by simply patching out the conditional jump (the same way as we patched out the conditional jumps in Stage 1).
Alternatively, we can load the executable under a debugger, set the breakpoint on the check, and change the flag to bypass it.
In order for the final flag to pop-up, two more conditions have to be met:
1. A process with a window of given class has to be running in the system.
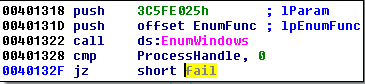
First, the EnumWindows function is called. The searched checksum is given in the parameter to the callback:
Inside the callback function, each window’s class name is compared to the checksum. If it matches, the particular process is being opened for further injection:
Someone may notice that this check is implemented similar to this one. The searched window class belongs to ProcessExplorer.
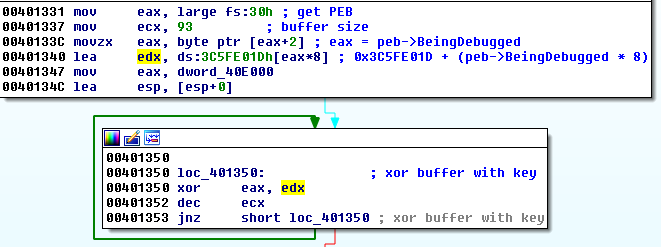
2. The application must be loaded under the debugger.
The presence of the debugger is being checked, and sets the flag that further on influences the value of the XOR key.
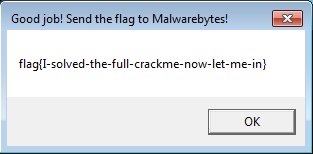
If we run the executable under the debugger and if we have a ProcessExplorer (32-bit) running, the MessageBox with the flag will be injected there and we will get the solution instantly. Example:
Dumping and running the shellcode
If we have luck, we may get it very quickly. But in real life, finding the proper process that has to be injected could be problematic. Also, people who were running the CrackMe on the 64bit version of Windows will encounter problems because the shellcode is 32bit and can be injected only to the 32bit version of Process Explorer. However, in order to solve it, knowing the process name is not at all required. We can just dump the shellcode before it is injected and load it by our own loader.
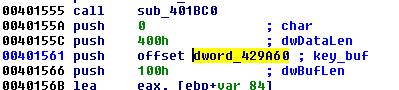
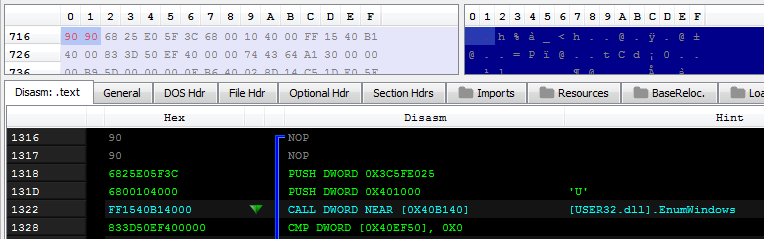
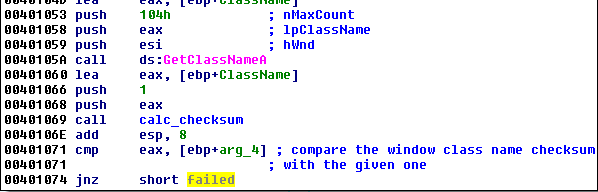
First, we have a look in IDA and see the part of the code where the injection is made. Before, the checksum of the shellcode is calculated:

So at this point we already have the valid shellcode stored in the buffer. We don’t really care where it is injected—we can just dump it and run it on our own. To reach this place, we only need to bypass the search of the window with the given checksum. We can do it by simply patching the condition (or changing the flag under debugger). This is the condition that must be patched out:

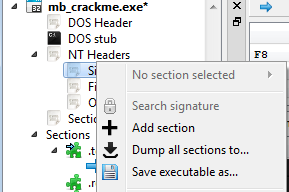
On the attached video we can see the full solution: dumping the shellcode and running it independently. In the given example, the shellcode was added as a new section to the original CrackMe with the help of PE-bear:
That’s how we got the final flag:
Conclusion
In this tutorial, I tried to explain step-by-step one of the possible solutions to the CrackMe. I recommend you to have a look at the write ups below to see different perspectives and learn more. And of course, I encourage you to try on your own and describe your own solution, because this is the best way to learn.Appendix
Received write ups:https://mauronz.github.io/mb-crackme/ – by @FraMauronz
https://drive.google.com/file/d/0Bzb5kQFOXkiSSURnMUZmaVpWRlk – by @JR0driguezB
https://drive.google.com/file/d/0Bzb5kQFOXkiSUmgwN2dWT21jdXM – by @ShAd0wHuNt3r_0
https://29wspy.ru/reversing/SolutionHasherezadeCrackme2017.pdf – by @ValthekOn